| Audience | Technical marketers, marketing and lifecycle teams |
| Prerequisites | Prepare data for AID → |
Connect Salesforce Marketing Cloud to AI Decisioning so agents can deliver personalized emails, SMS, push notifications, and in-app messages through your existing SFMC Triggered Sends and Journeys.
What you'll learn
In this article, you'll learn how to:
- Set up SFMC as a destination
- Add channels in AI Decisioning
- Add messages from SFMC
- Configure SFMC Triggered Sends and Journeys for AID
- Use dynamic variables in SFMC templates
Overview
Hightouch's AI Decisioning (AID) helps you deliver real-time, personalized messages based on live customer context and predictions. By connecting AID with Salesforce Marketing Cloud (SFMC), you can:
-
Automatically trigger messages from AID Agents via SFMC Triggered Sends or Journeys
-
Personalize SFMC templates using dynamic variables from Hightouch—no custom code required
-
Centralize targeting and decision logic in Hightouch, while using SFMC to handle message delivery
1. Set Up SFMC as a Destination
Why these permissions matter
To send messages through SFMC using AID, Hightouch needs access to certain channels, content, and user data. These permissions allow Hightouch to:
-
Trigger messages via Triggered Send and Journey Builder
-
Read and update subscriber data
-
Access and personalize email, SMS, push, and in-app templates
Connect SFMC and grant permissions
In SFMC:
-
Create an installed package in SFMC until you reach Set Server-to-Server Properties.
-
Under Channels, enable the permissions for each message type you want Hightouch to use (read, write, send, publish, or post).
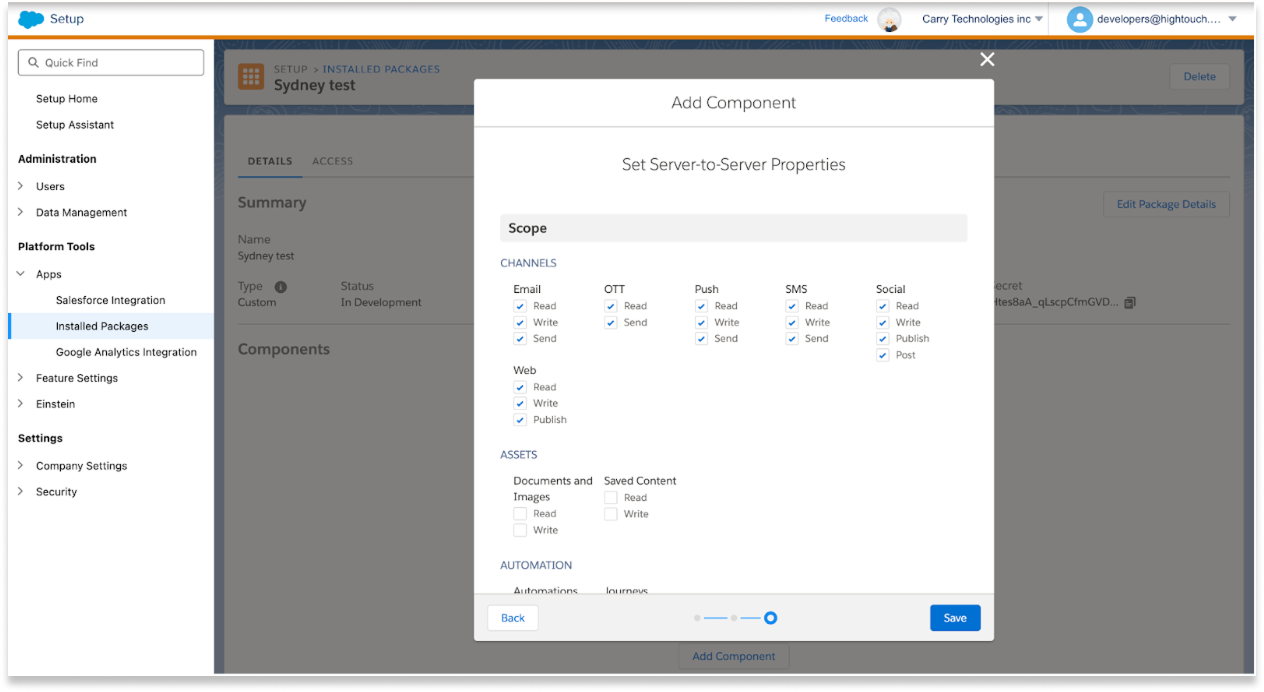
- Click Save.
In Hightouch:
-
Continue setting up the SFMC destination until you reach the Custom Scopes step.
-
Under Advanced permissions > Custom Scopes, paste in the following:
email_read email_write email_send accounts_read data_extensions_read data_extensions_write journeys_read journeys_write journeys_aspr journeys_execute list_and_subscribers_write list_and_subscribers_read push_read push_write push_send
- Click Test Connection to verify that setup is complete.
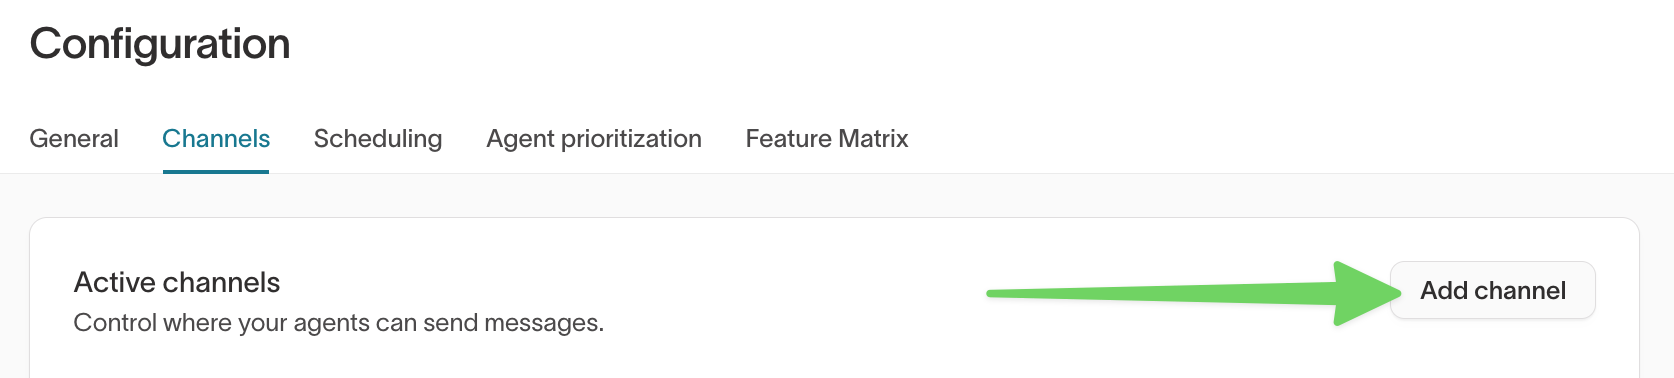
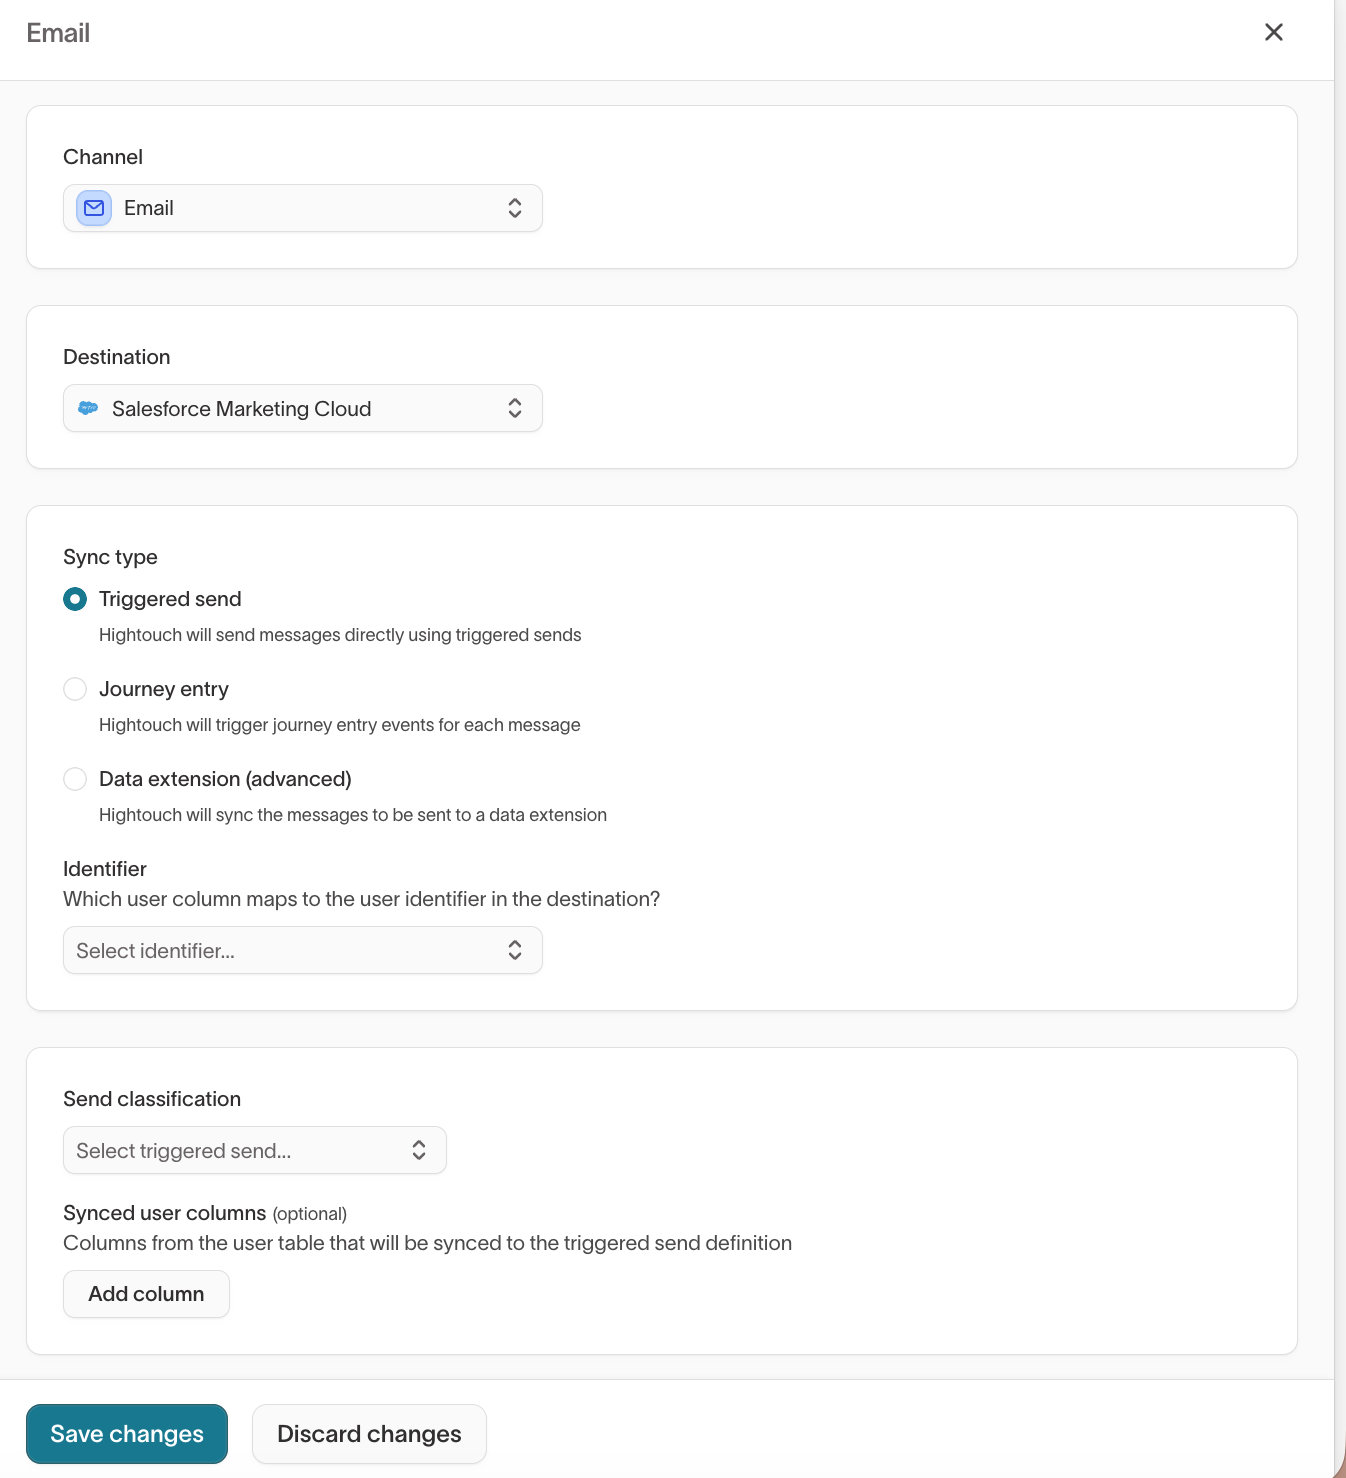
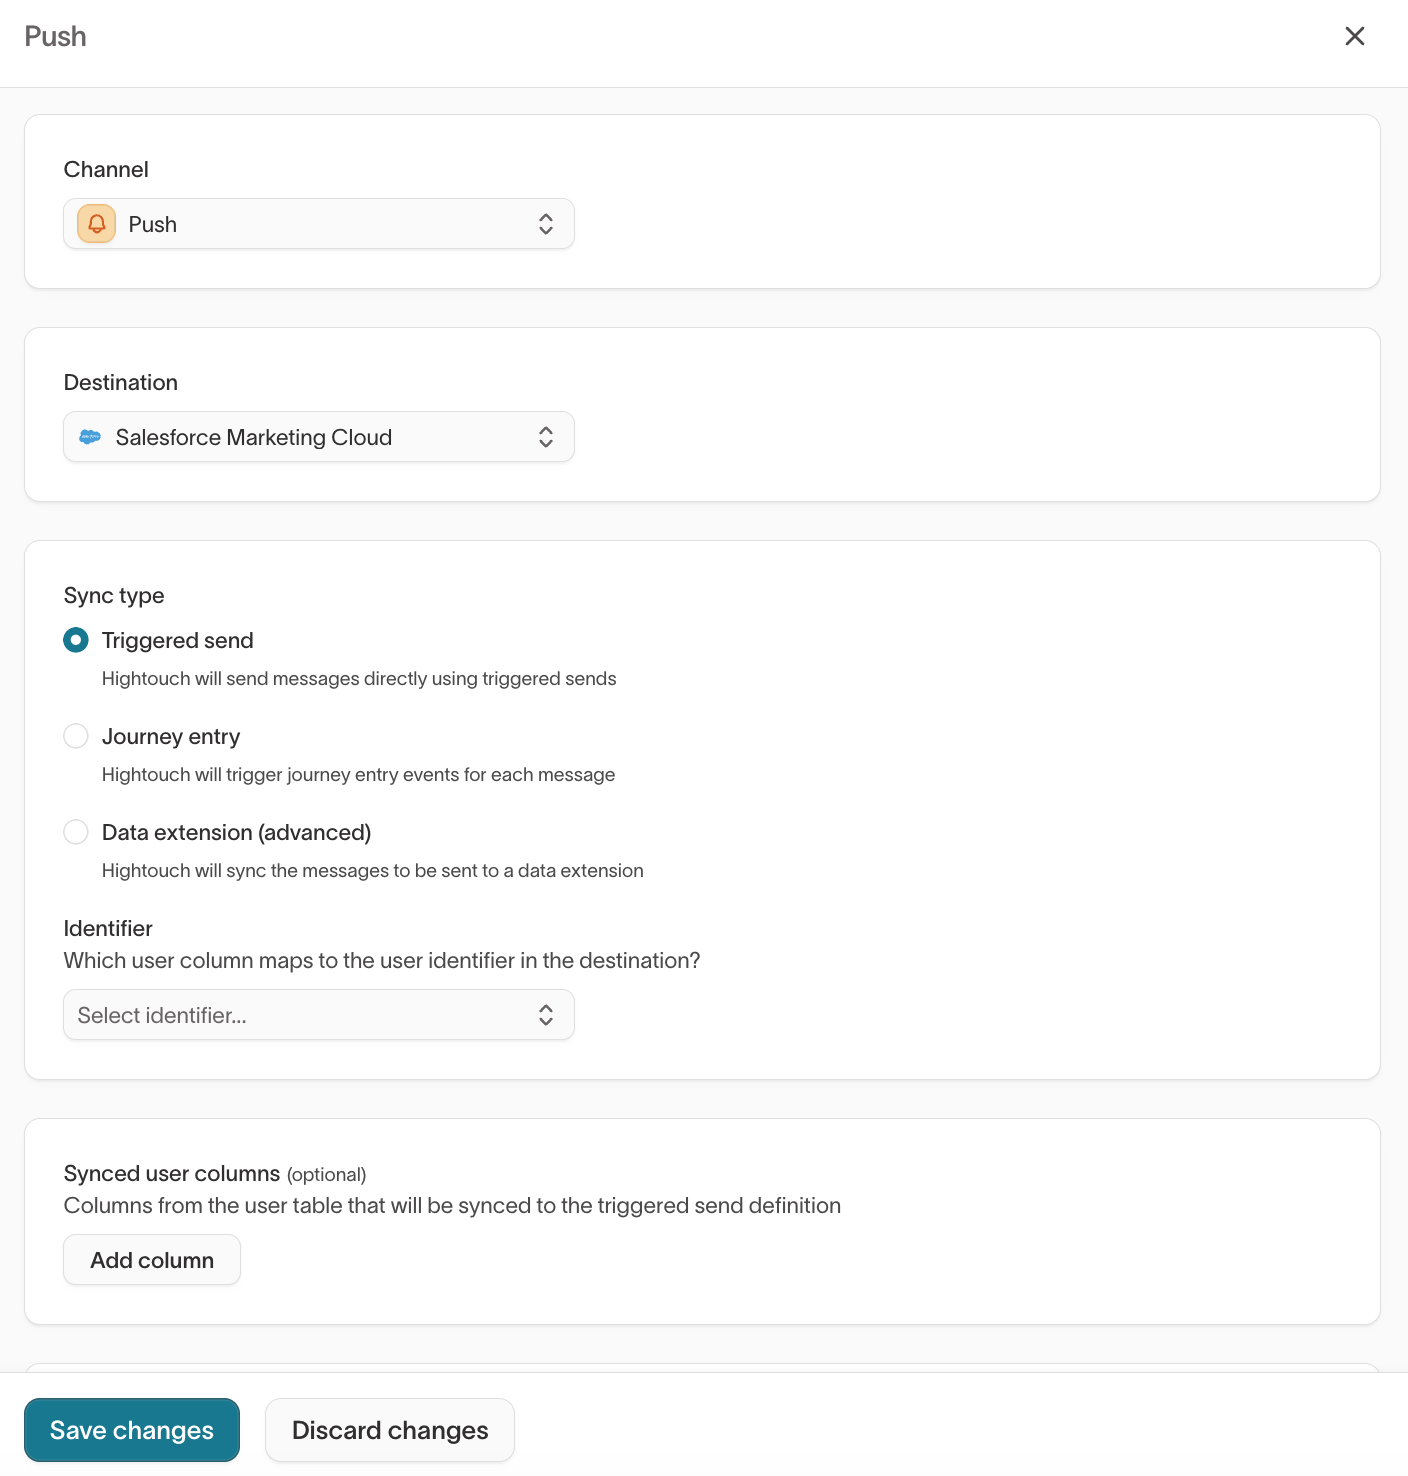
2. Add Channels in AI Decisioning
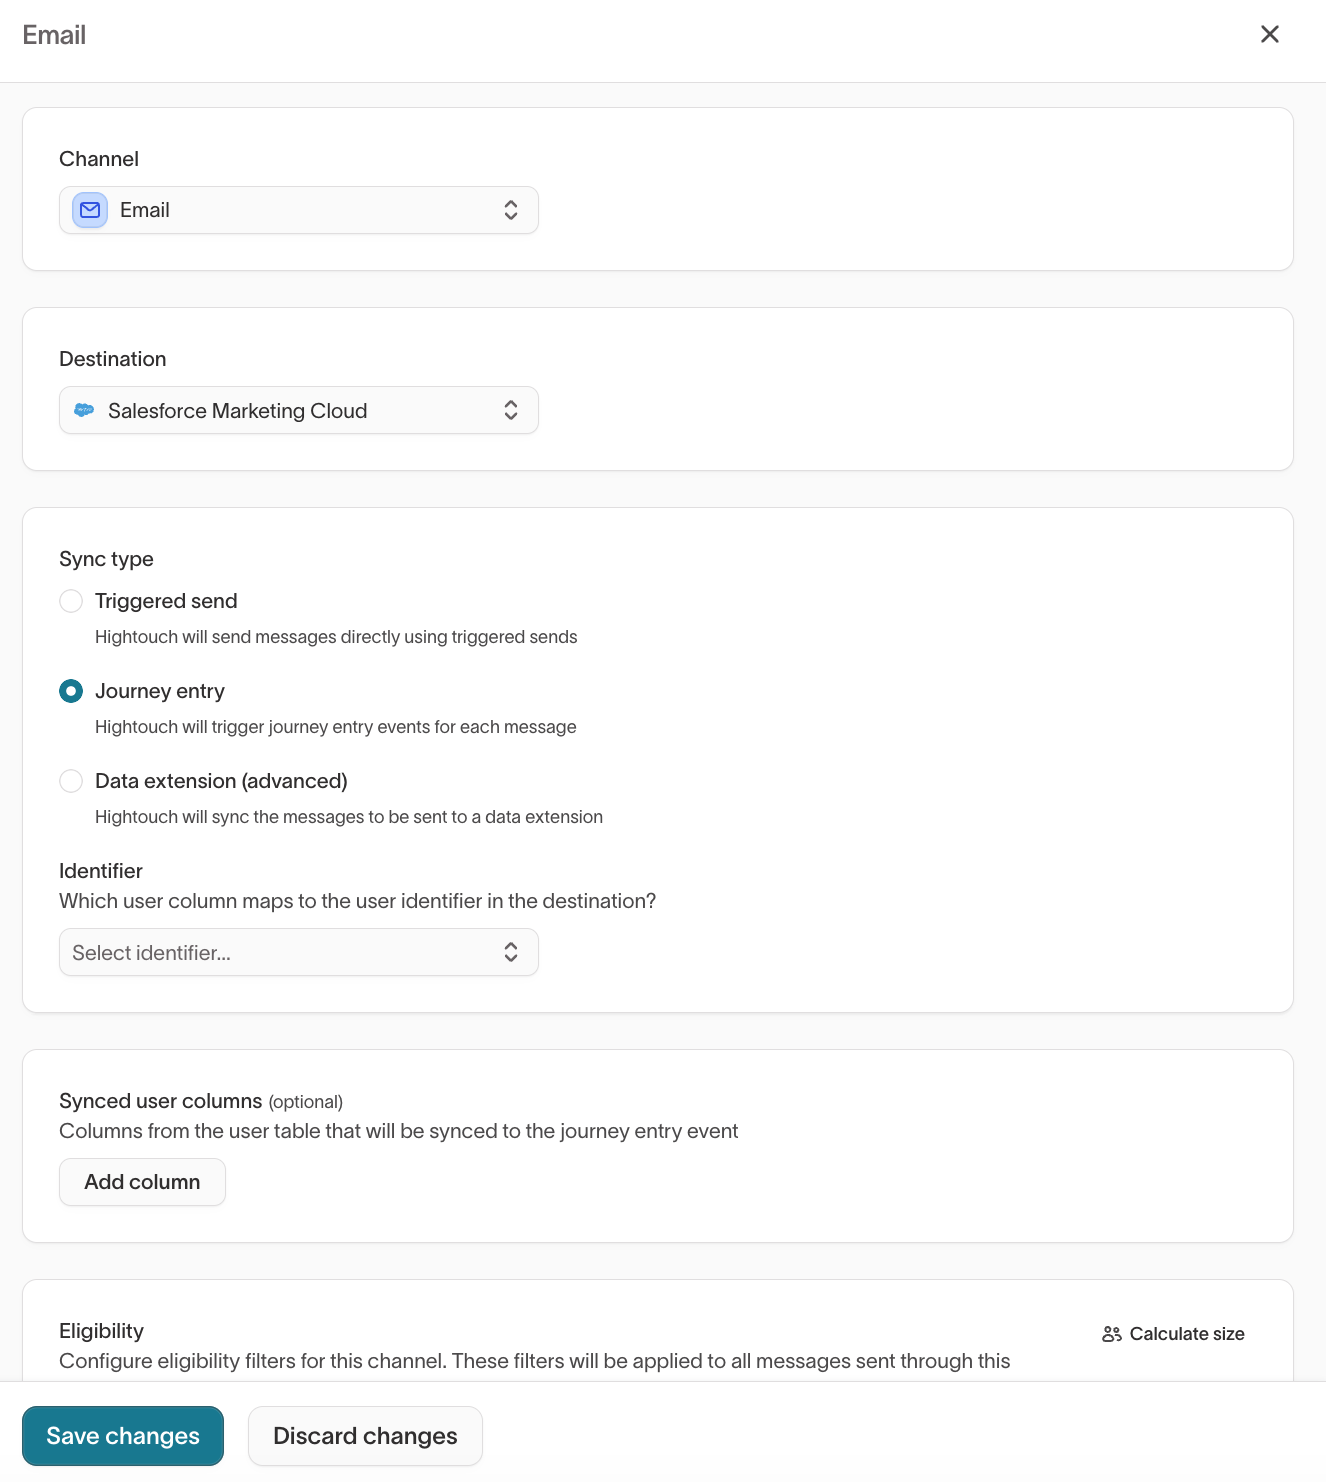
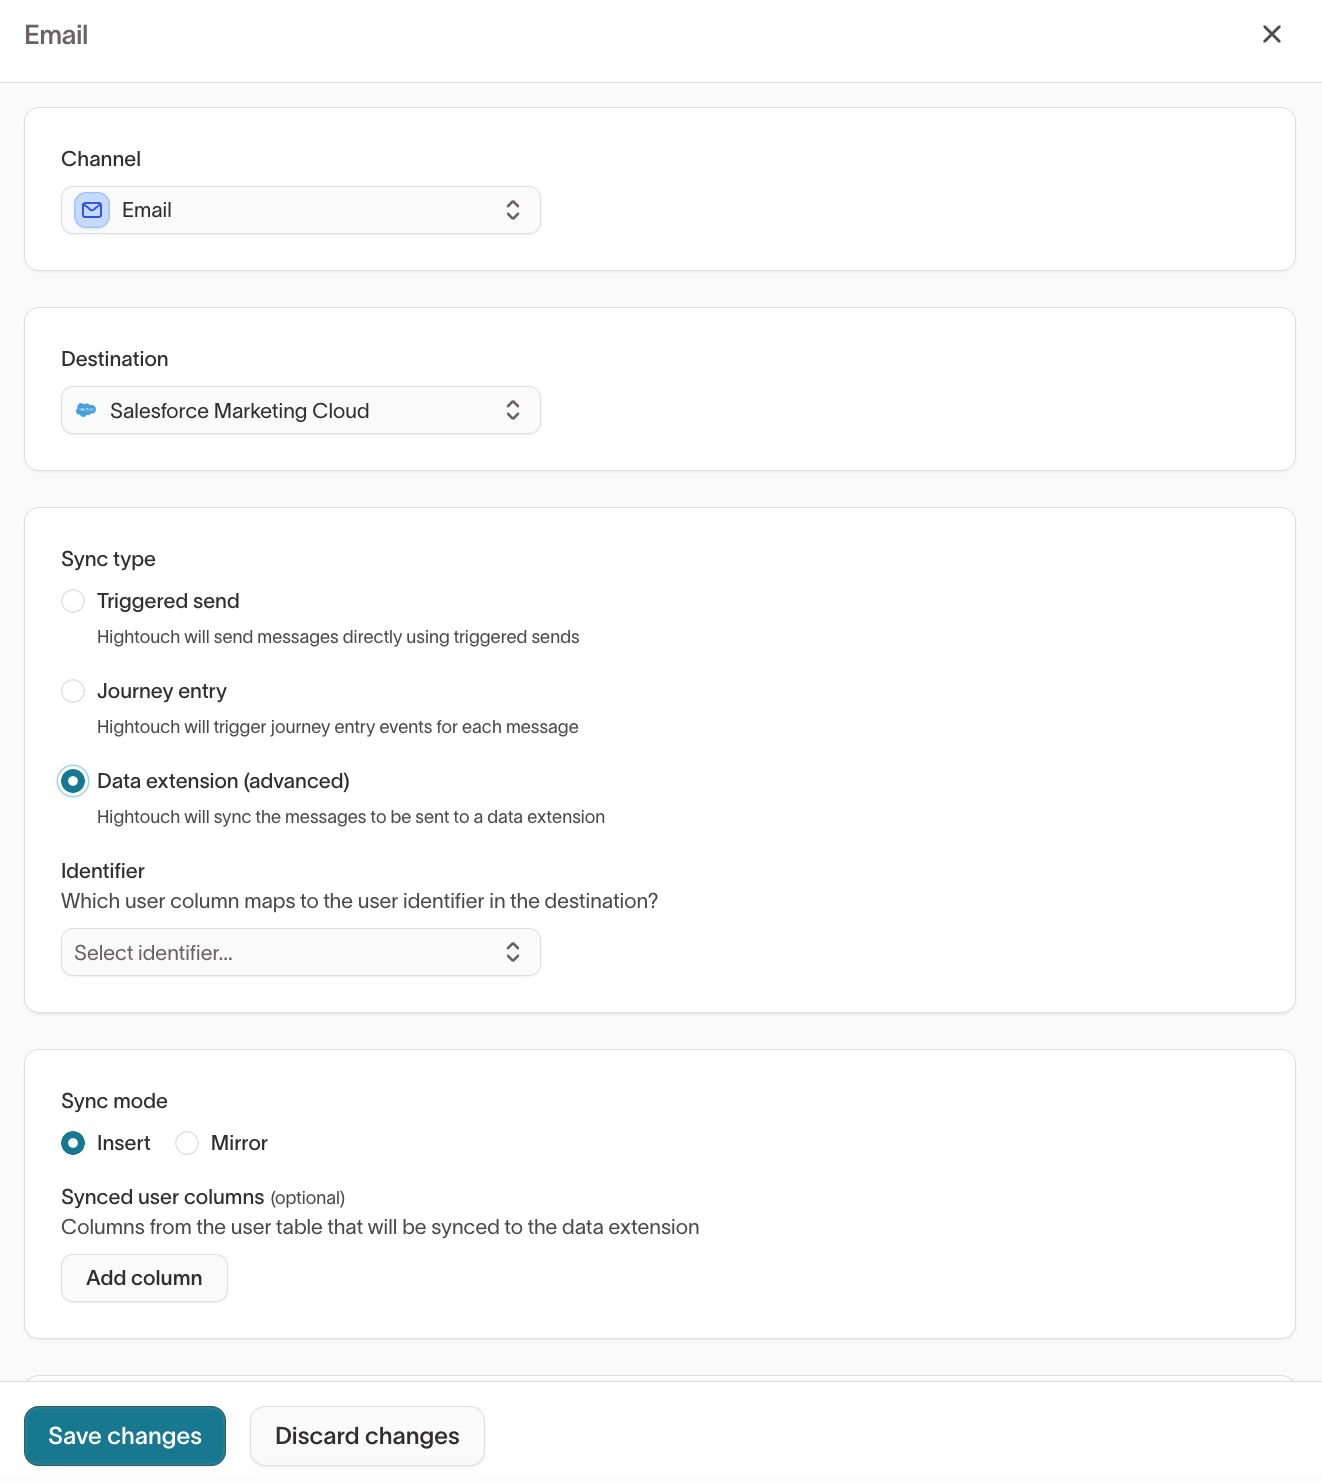
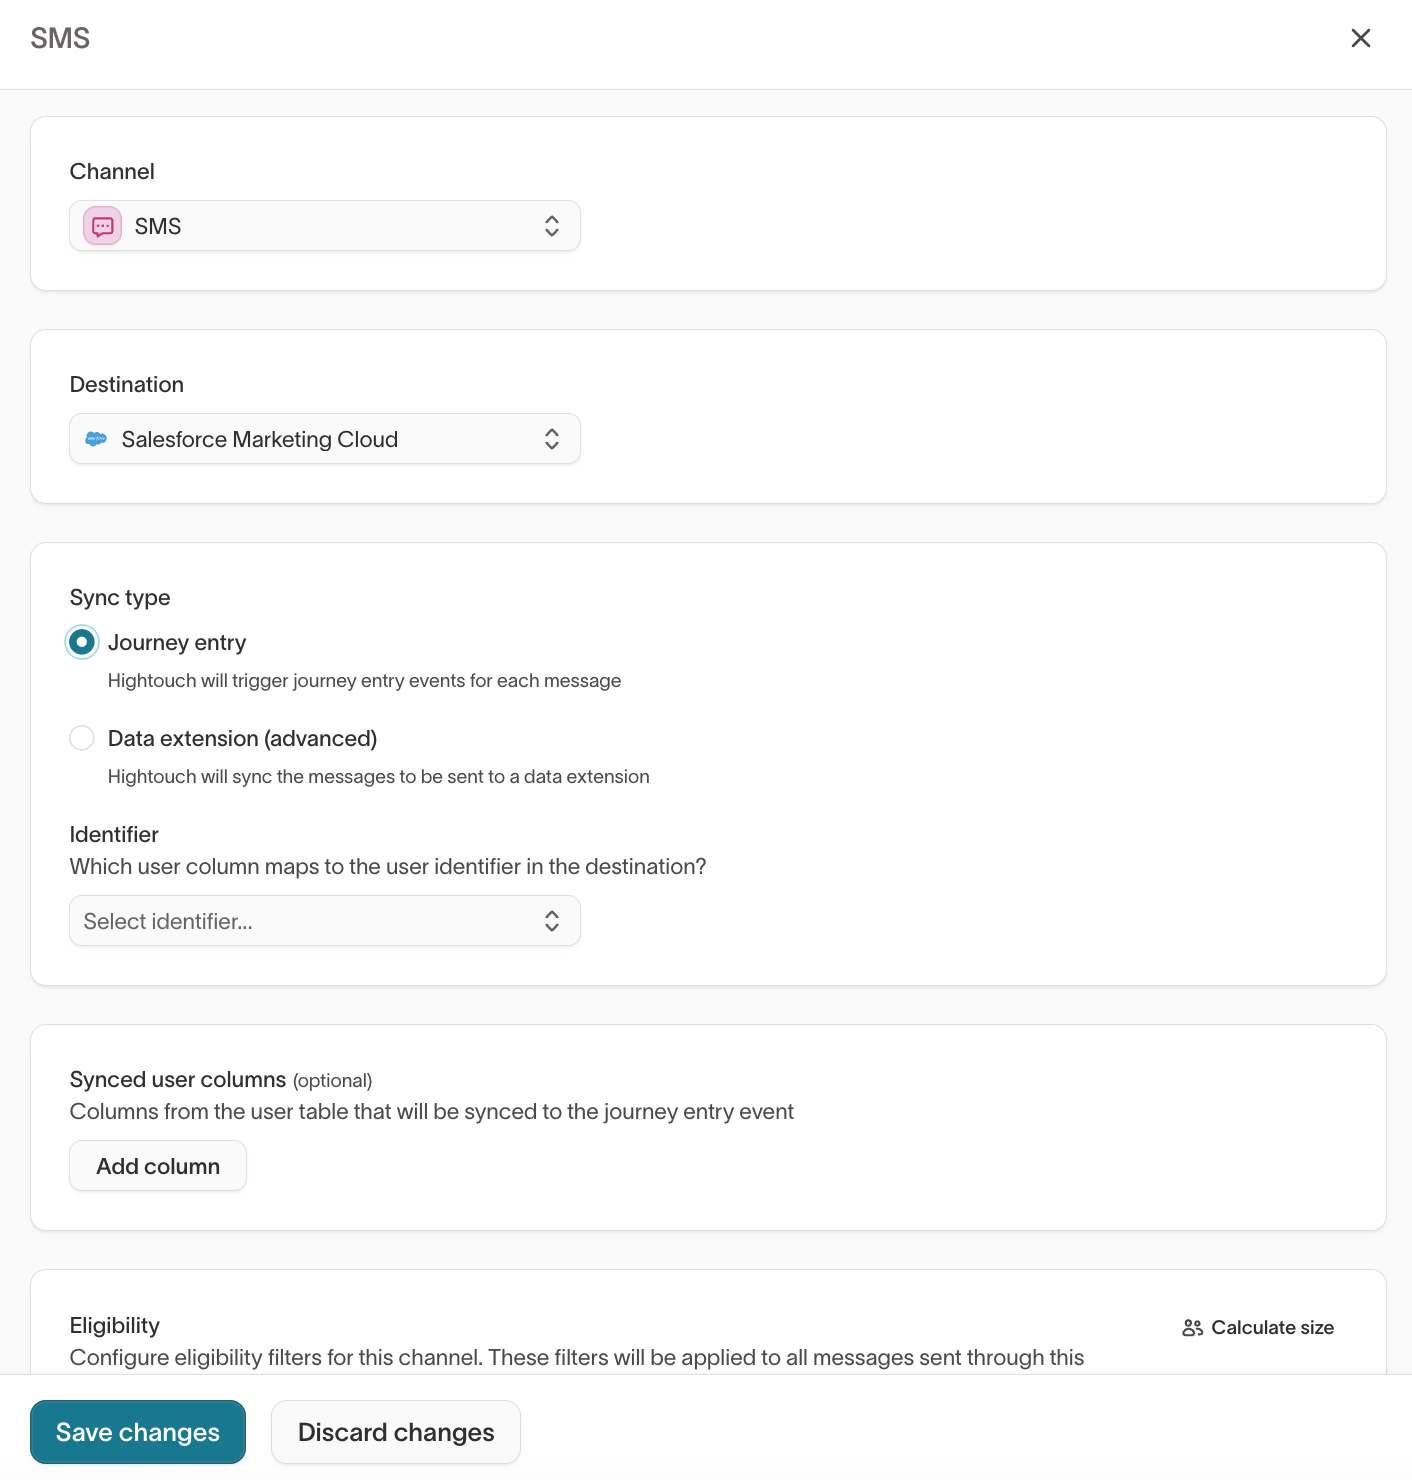
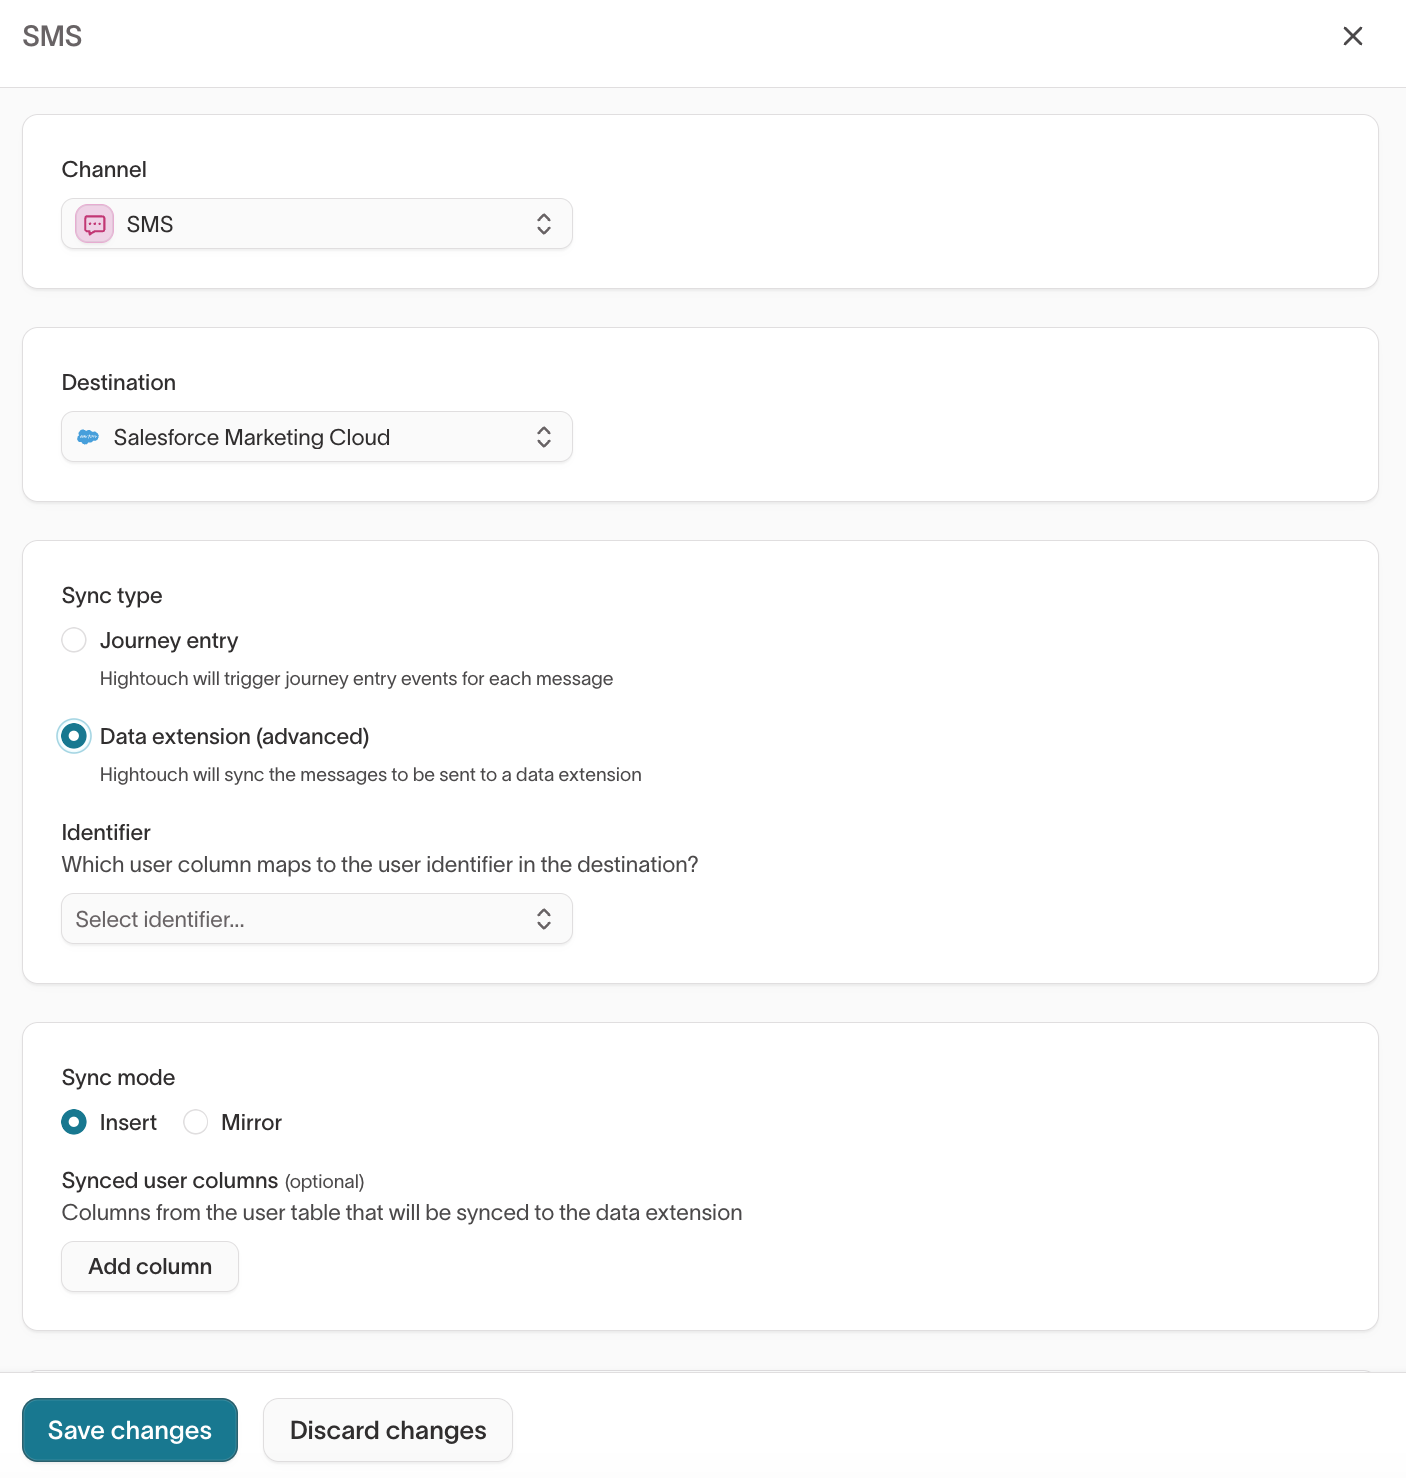
Once SFMC is set up as a destination, you can add channels. Channels define how Hightouch sends messages to SFMC—via Triggered Sends or Journeys.
Set up a channel
- Go to
AI Decisioning → Configuration → Channels. - Click
Add channel.
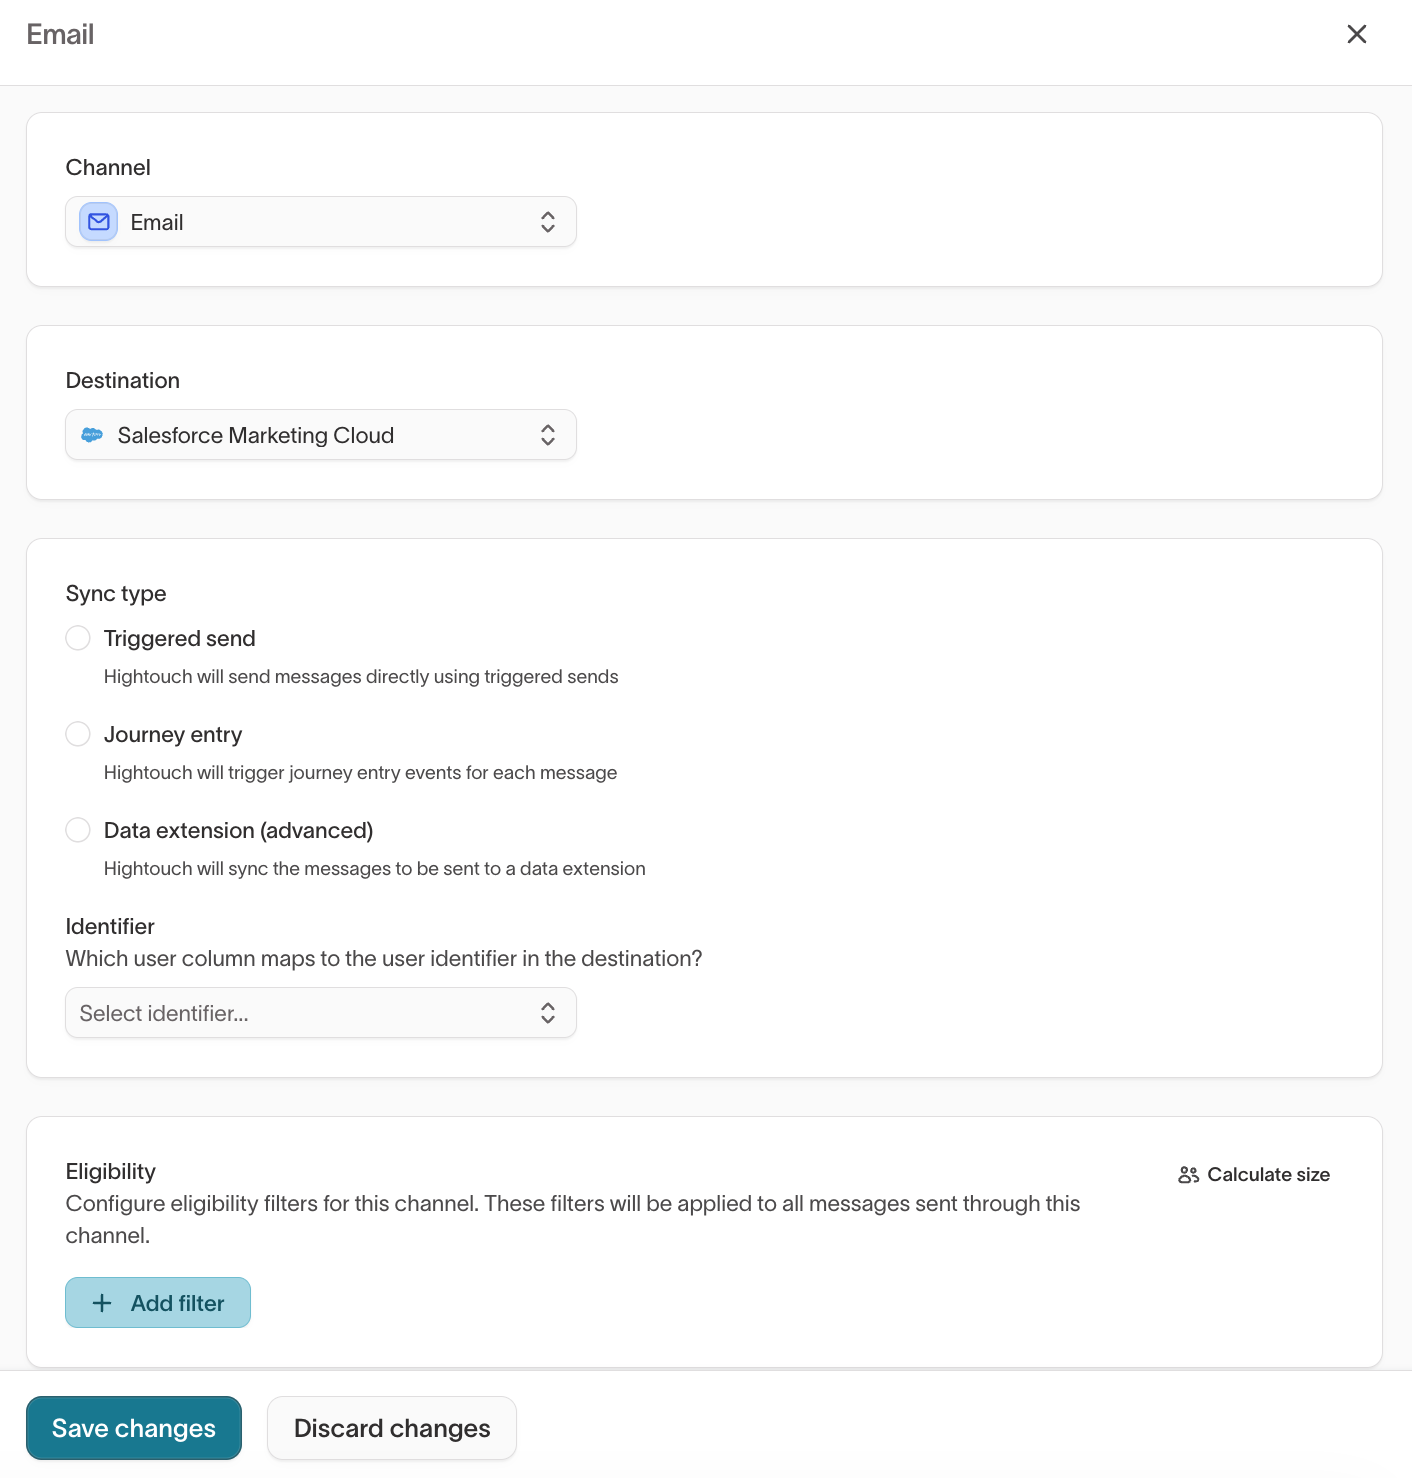
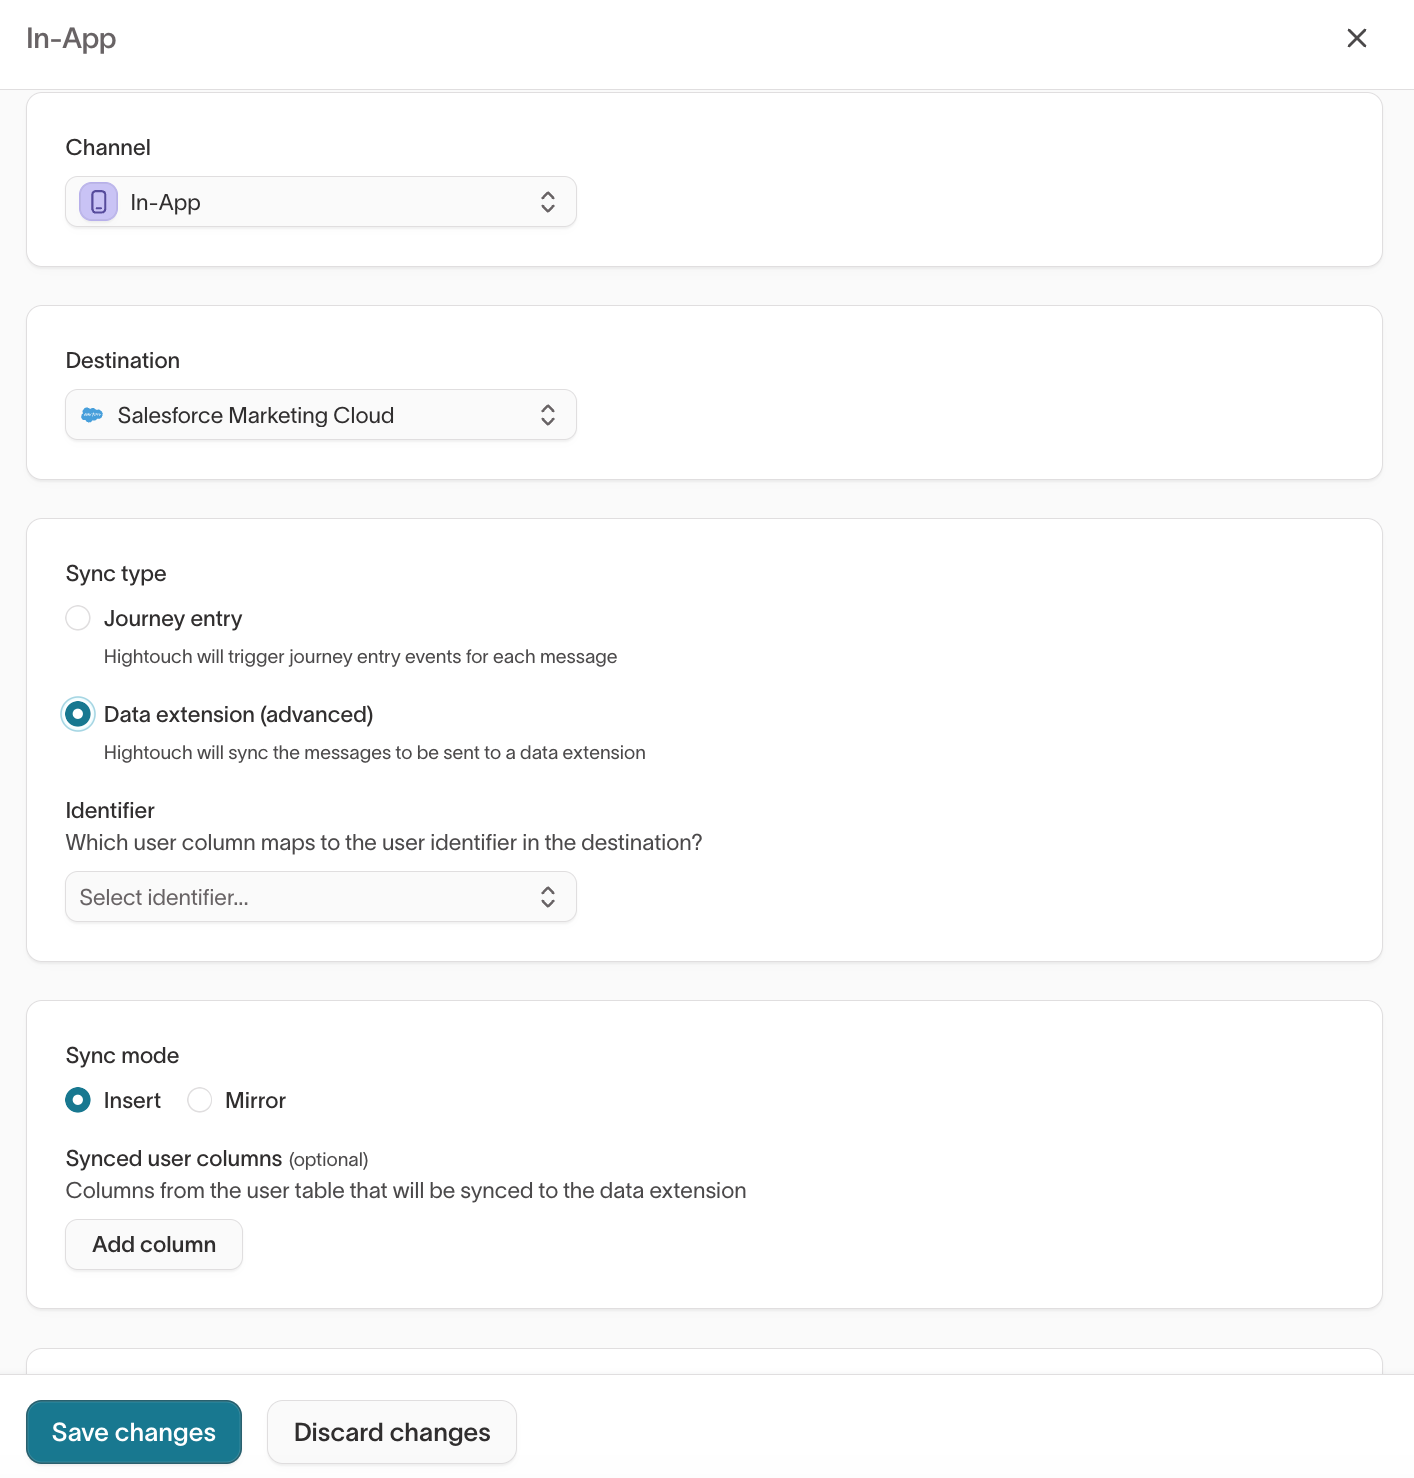
- Choose a channel type: Email, SMS, Push, or In-App.
- Select Salesforce Marketing Cloud as the destination.
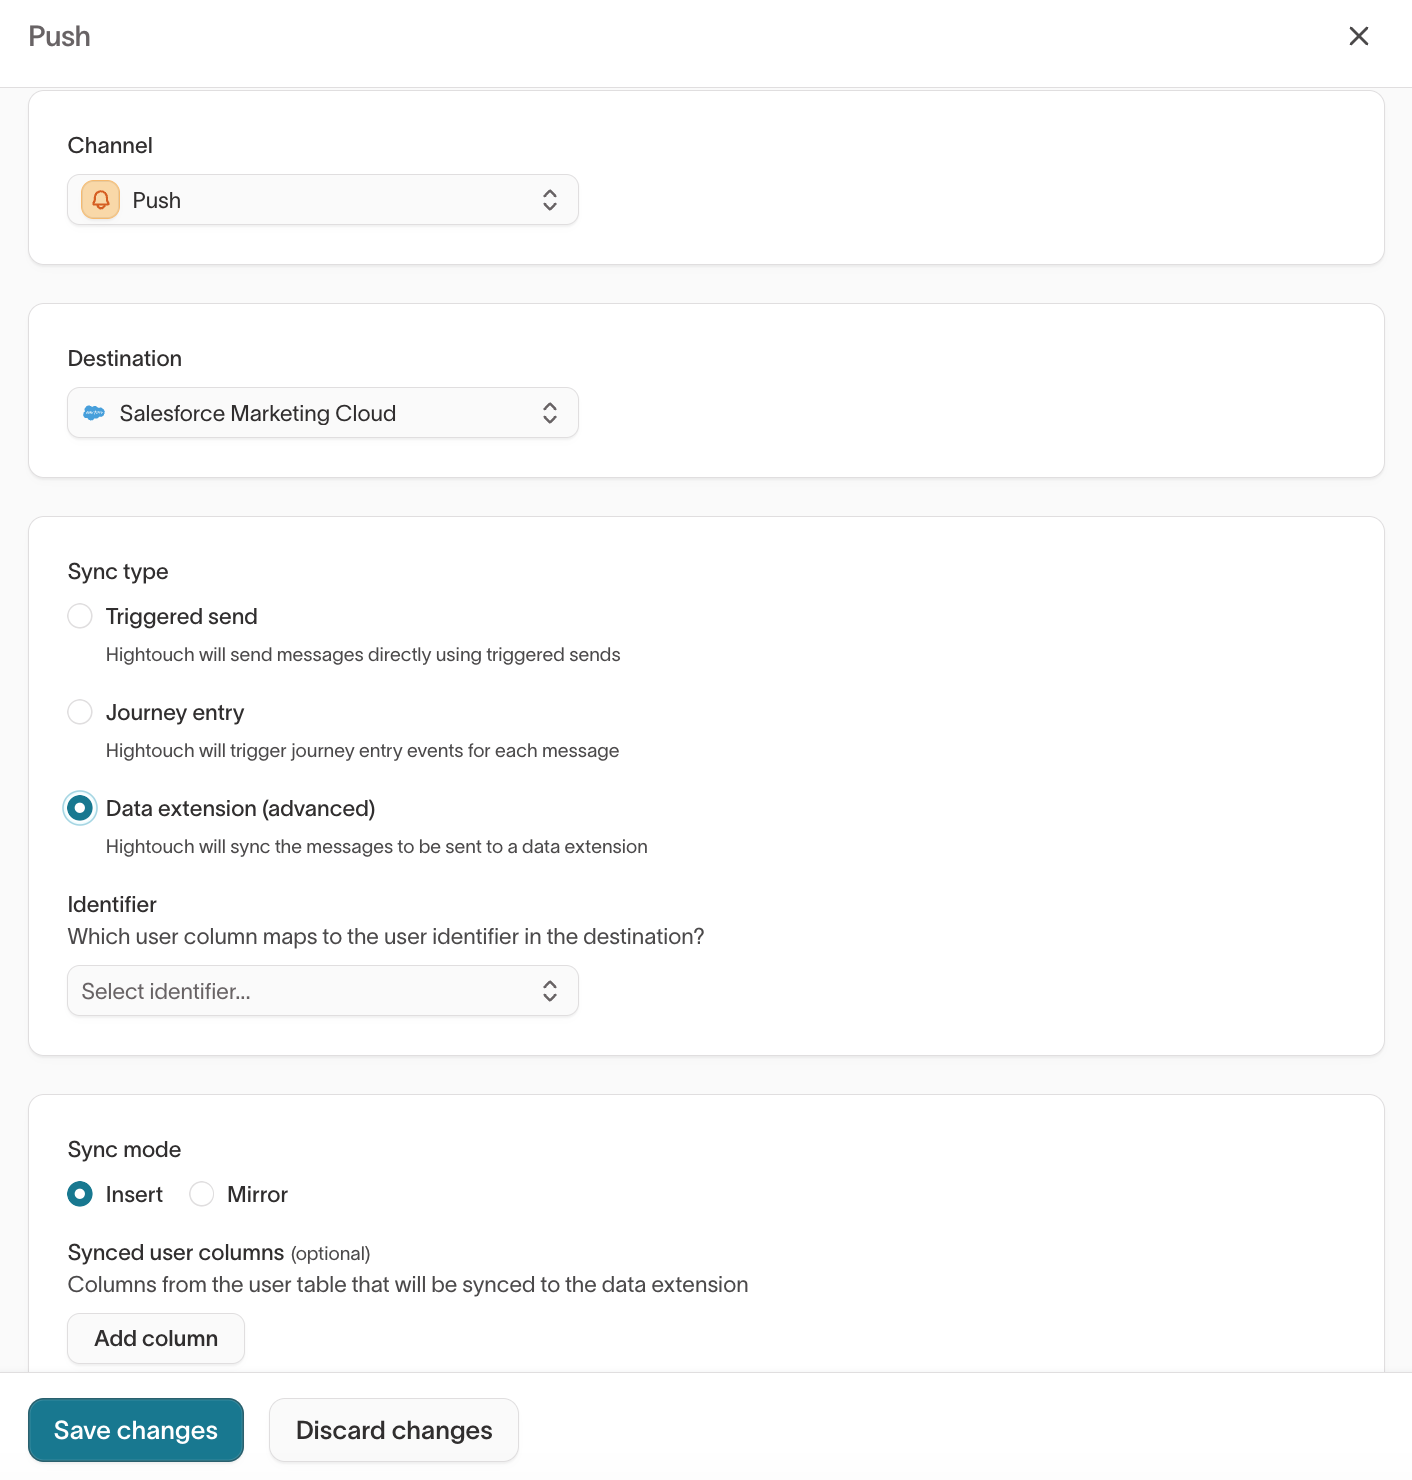
- Select a sync type:
- Triggered Send – sends a 1:1 message in real time
- Journey entry – sends as part of a journey workflow
- Data Extension (advanced) – batch sends managed within SFMC
- Choose an Identifier that matches the Subscriber Key field in SFMC (for example, email or user ID).
- Click
Add channel, thenSave changes.
Sync type comparison
The Sync Type determines how Hightouch sends messages through SFMC:
| Channel | Triggered Send | Journey | Data Extension |
|---|---|---|---|
| ✅ | ✅ | ✅ | |
| SMS | ❌ | ✅ | ✅ |
| Push | ✅ | ✅ | ✅ |
| In-App | ❌ | ✅ | ✅ |
| Sync type | Best for | Setup notes |
|---|---|---|
| Triggered Send | Real-time, event-based sends tied to a single user action | Requires send classification: use Commercial for marketing content (users can opt out) or Transactional for system notifications (users can't opt out). |
| Journey entry | Automated, multi-step campaigns (for example, onboarding, retargeting) | Select the Synced user columns (for example, email, name, product interest) you want to sync. These fields are available inside the journey's Data Extension for personalization or decision splits. |
| Data Extension (advanced) | Batch sends, scheduled campaigns, and advanced setups where you need full control over delivery logic | A Data Extension is a table in SFMC that stores subscriber or message data. When you choose this sync type, Hightouch writes data directly to a Data Extension, and you manage the send logic (timing, audience filters, scheduling) within SFMC. This gives you the most flexibility but requires more setup on the SFMC side. Choose Insert to append new rows or Mirror to keep the Data Extension in sync with your warehouse. |
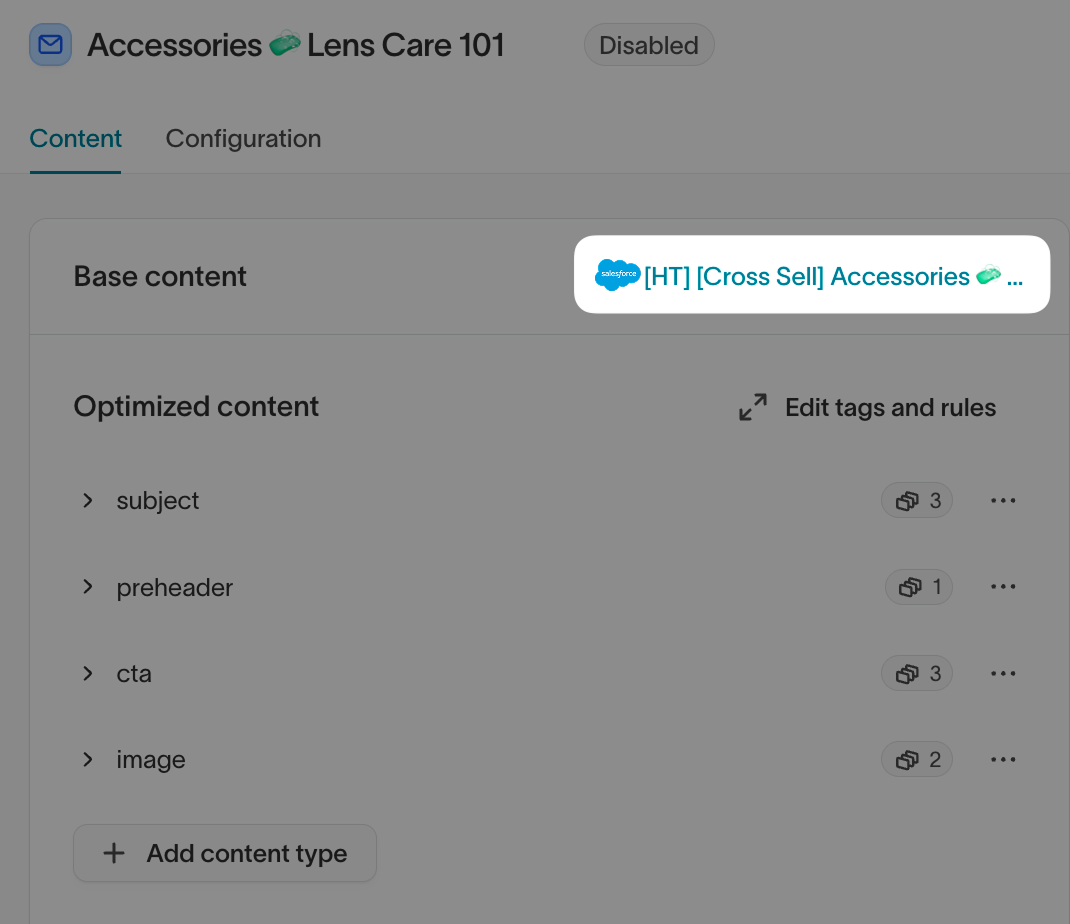
3. Add Messages
After you add channels in AI Decisioning, you can add messages to your agents. Each message connects an agent's decision to a specific template in SFMC.
For full details on message configuration, variants, and tags, see Messages →.
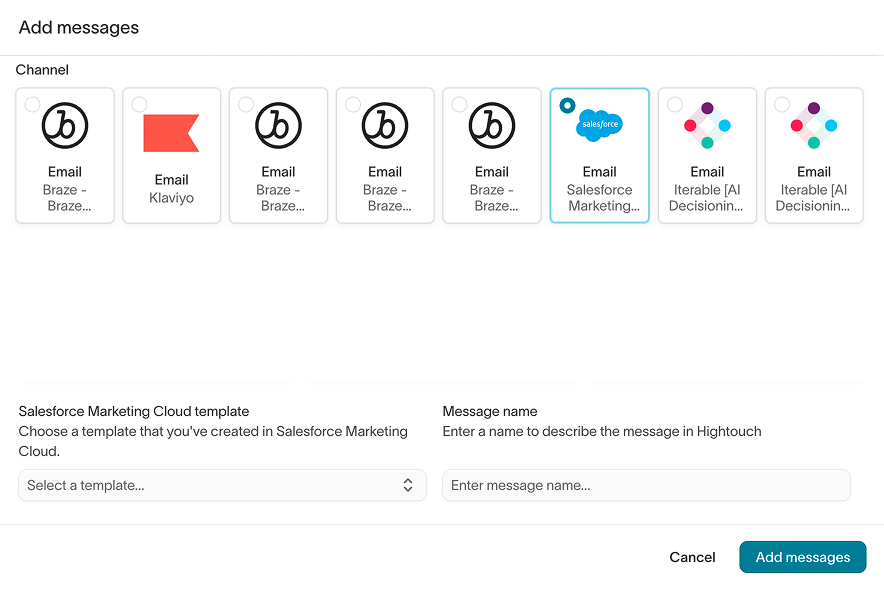
Add a message from SFMC
- Go to
AI Decisioning → Agentsand select your agent. - Open the
Messagestab. - Click
Add messages, then select Add messages individually. - Select your configured SFMC channel and destination tile (for example, Email - Salesforce Marketing Cloud).
- Select the appropriate template or event identifier from SFMC.
- Enter a message name and click
Add messages.
You can repeat this process for any channel and sync type. Continue the setup process in the channel-specific sections below:
- Send emails via Triggered Send
- Send emails via Journey
- Send emails via Data Extension
- Send SMS via Journey
- Send SMS via Data Extension
- Send push (outbound) via Triggered Send
- Send push (app inbox) via Triggered Send
- Send push via Journey
- Send push via Data Extension
- Send in-app via Journey
- Send in-app via Data Extension
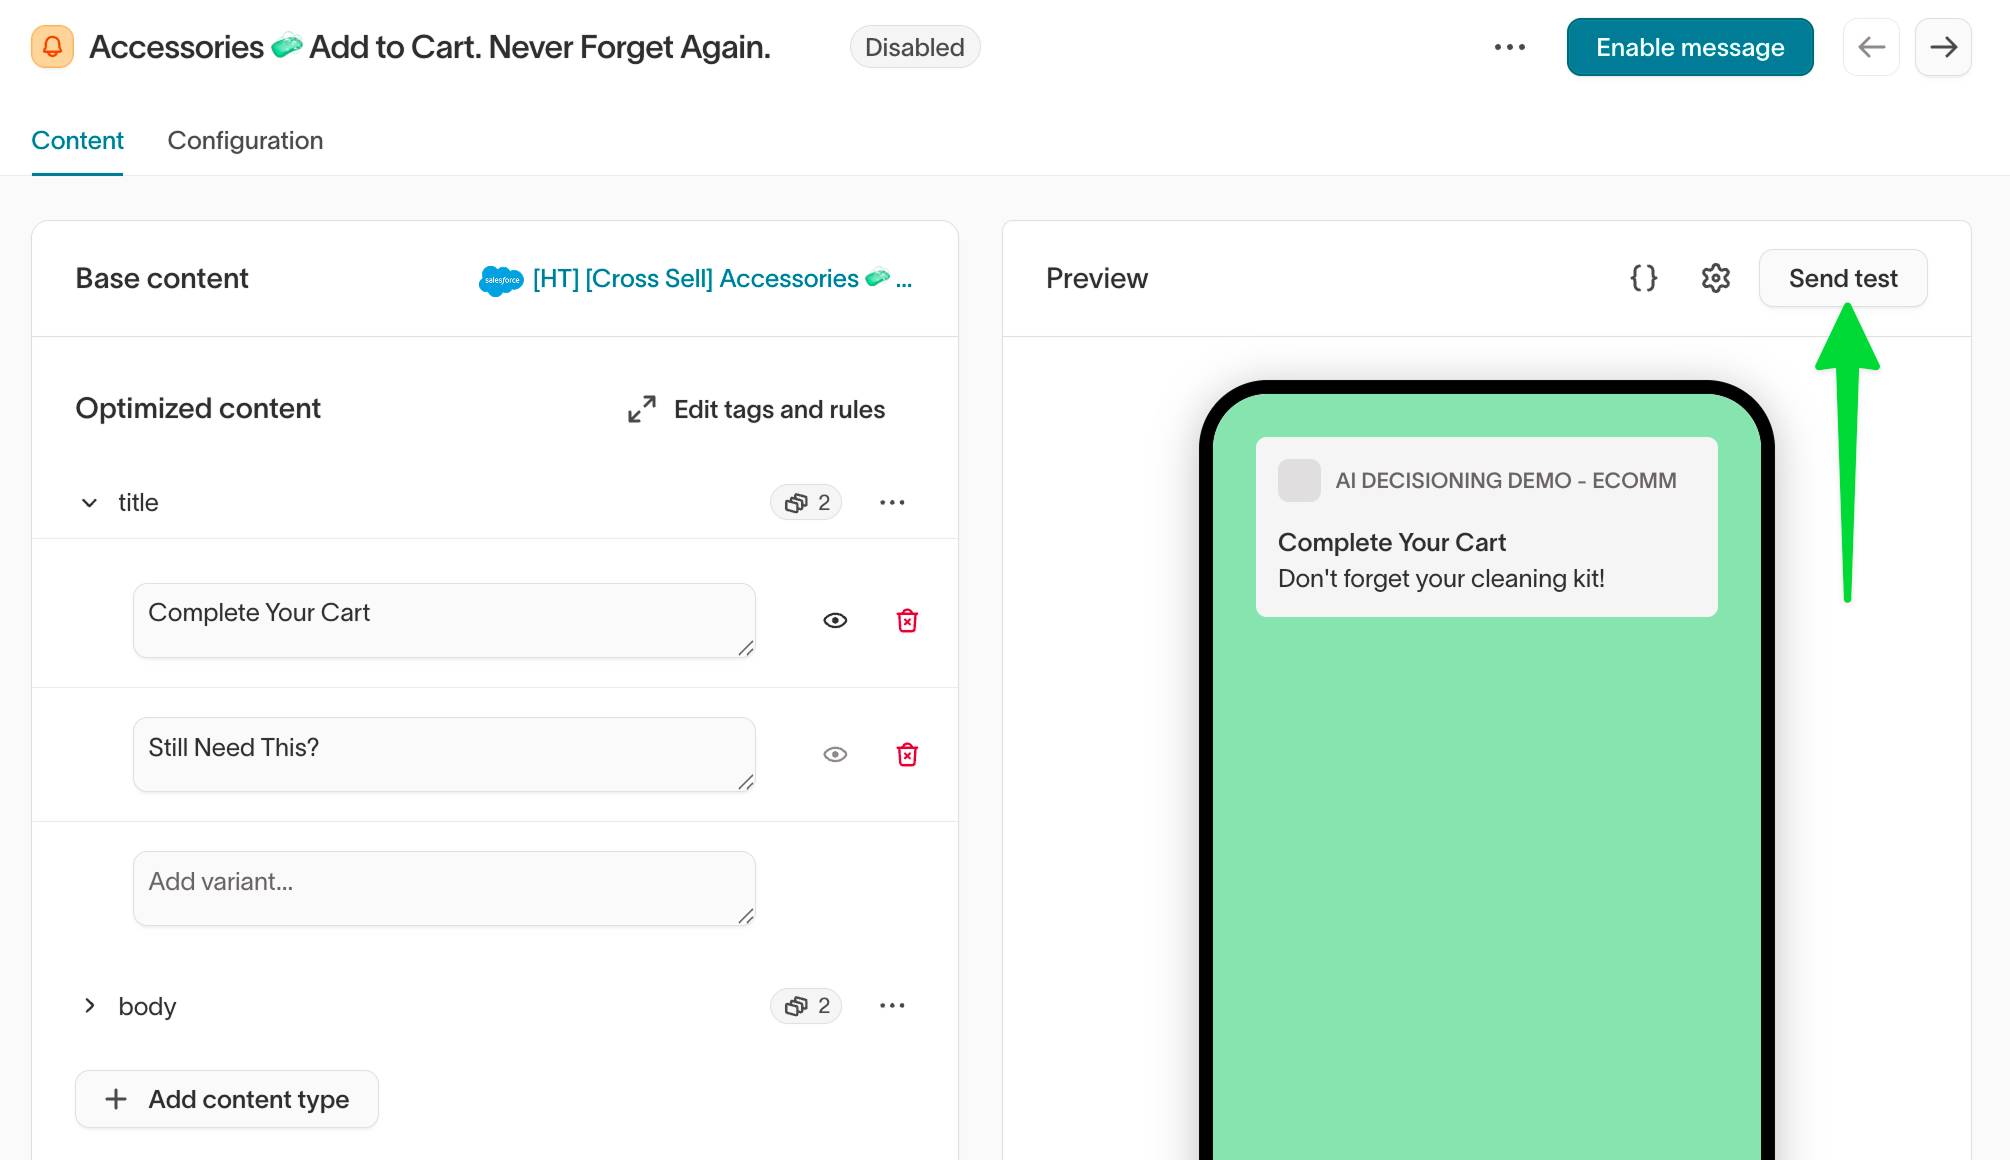
Test a message
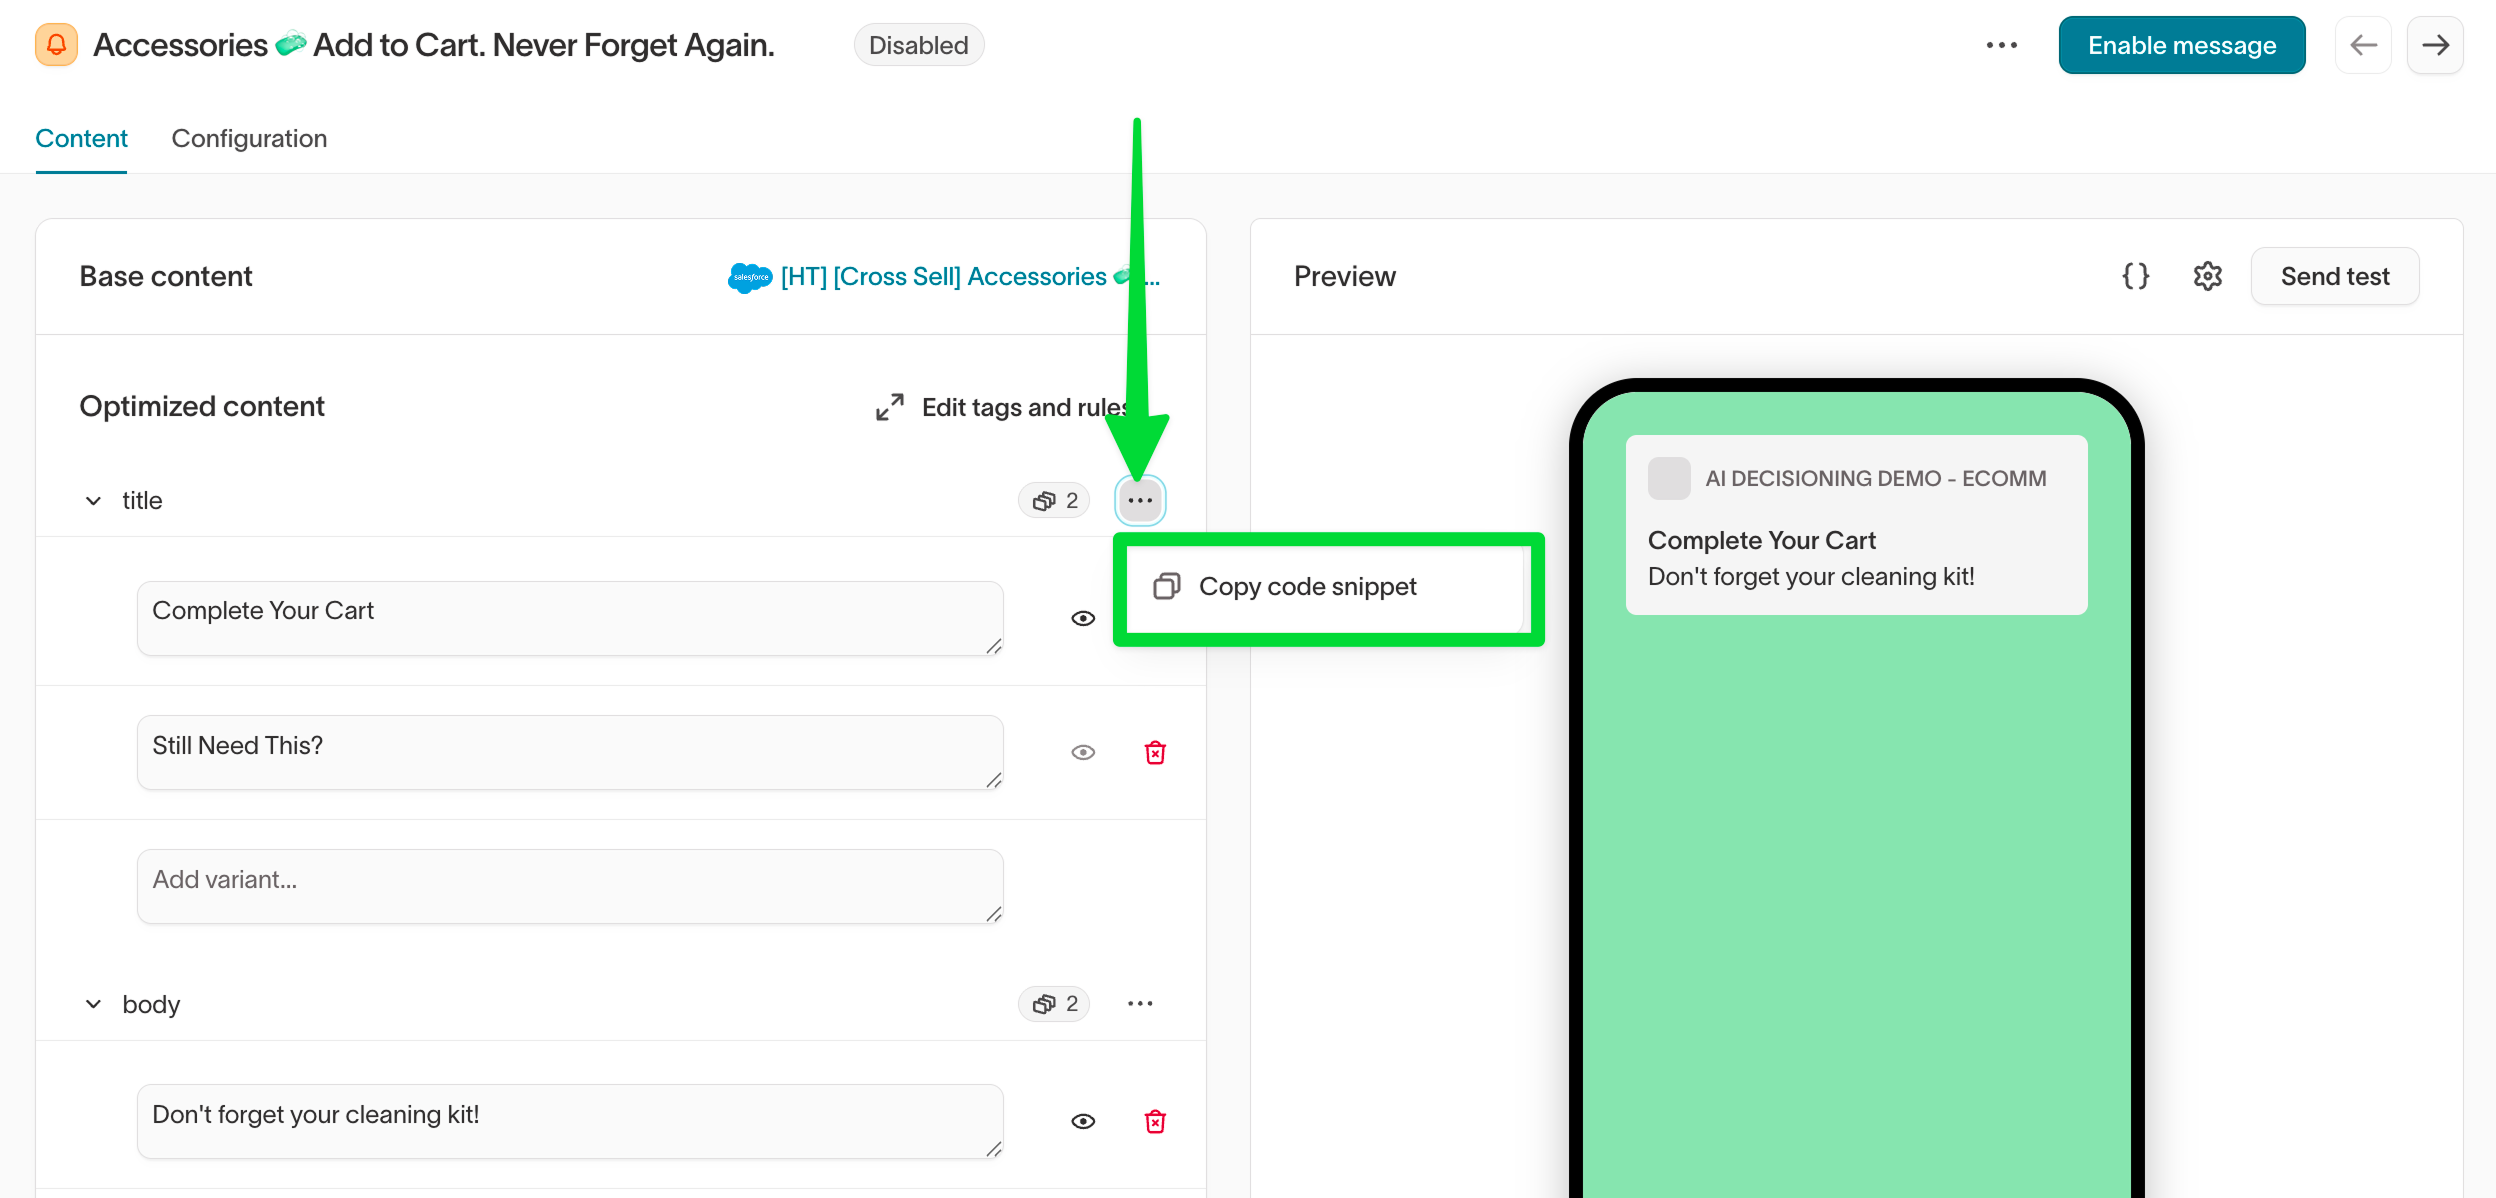
- Open the message and go to the
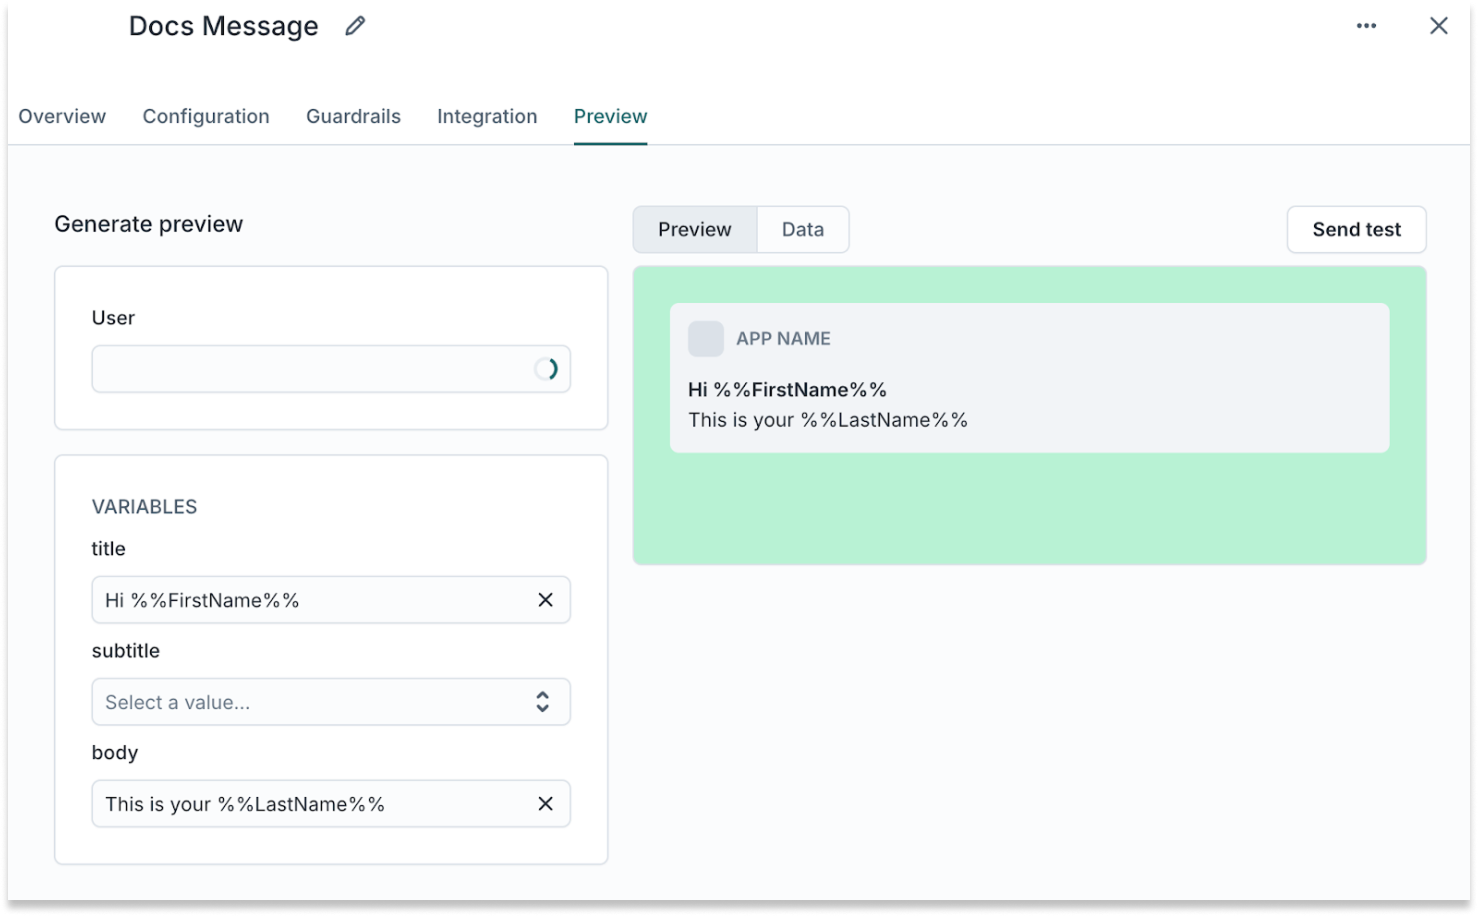
Contenttab. - Under Optimized content, confirm your variants are configured. If your message uses dynamic variables, set values for testing.
- In the Preview panel, verify the rendered message looks correct.
- Click
Send testto send the message to a test user.
4. Configure SFMC Triggered Sends and Journeys for AID
Before adding a message in Hightouch, you need to configure the corresponding Triggered Send or Journey in SFMC.
Send emails via Triggered Send
- Add a channel with the sync type set to Triggered Send.
- Add a message from your SFMC email template.
- Close the window that opens and return to the Messages tab.
- Click the link next to Base content to go to SFMC.
- This will prompt you to log in to SFMC and should open the Email Studio > Interactions page.
- Click Triggered Sends.
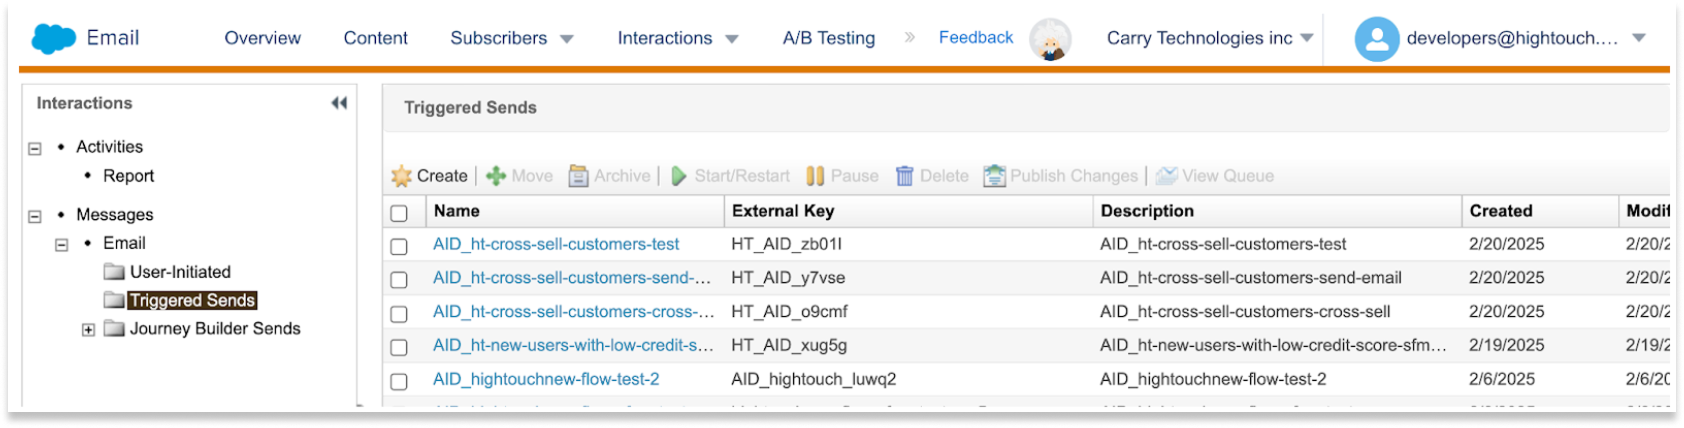
- Select the send name that corresponds with your newly created message.
- Click Start/Restart.

- Return to Hightouch and open your message.
- In the Content tab, set the variables and click Send Test.
Send emails via Journey
- Add a channel with the sync type set to Journey entry.
- Add a message from your SFMC email template.
- In the Content tab, set the variables and click Send Test.
Send emails via Data Extension
- Add a channel with the sync type set to Data Extension.
- Choose Insert (append new rows) or Mirror (keep in sync with your warehouse).
- Add a message from your SFMC email template.
- In SFMC, configure your send logic (automation, query activity, or triggered automation) to read from the Data Extension that Hightouch populates.
Send SMS text messages via Journey
- Add a channel with the sync type set to Journey entry.
- Add a message from your SFMC SMS template.
- In the Content tab, set the variables and click Send Test.
Send SMS text messages via Data Extension
- Add a channel with the sync type set to Data Extension.
- Choose Insert or Mirror mode.
- Add a message from your SFMC SMS template.
- In SFMC, configure your send logic to read from the Data Extension that Hightouch populates.
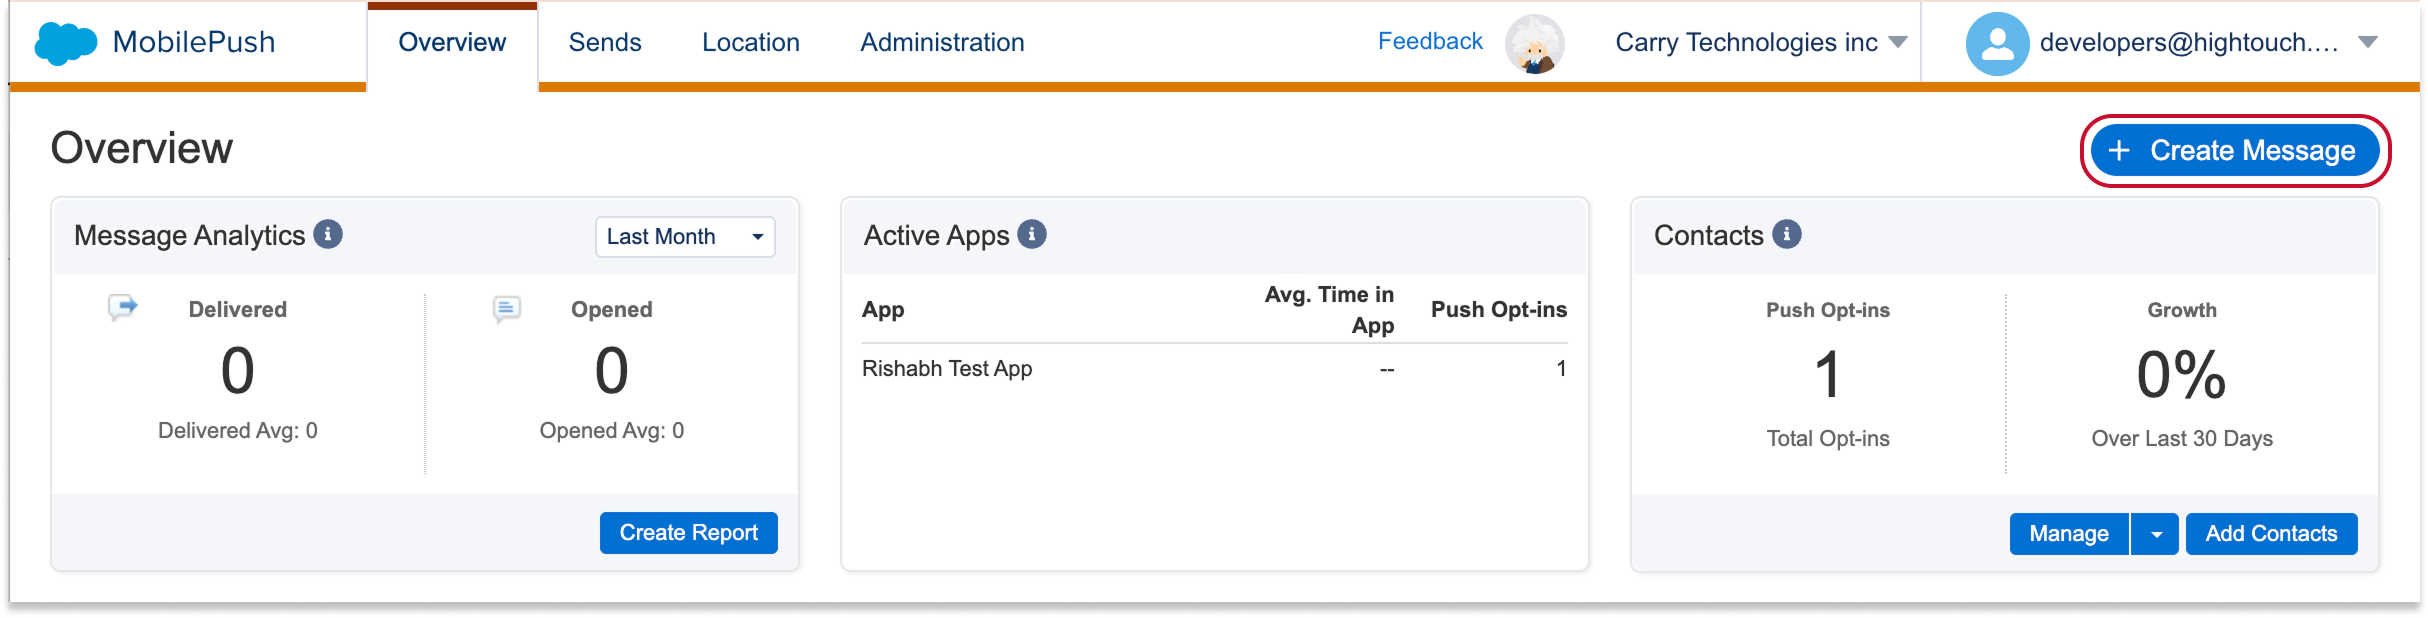
Send push (outbound) notifications via Triggered Send
Enable the push channel
- Add a channel with the sync type set to Triggered Send.
Configure your push template in SFMC
In SFMC:
- Go to Mobile Studio > MobilePush.
- Click Create Message.
- Select the Outbound template and click Next.
- Name your message and select your app.
- Select API Triggered as the Send Method.
- Select Alert as the Push Method and click Next.
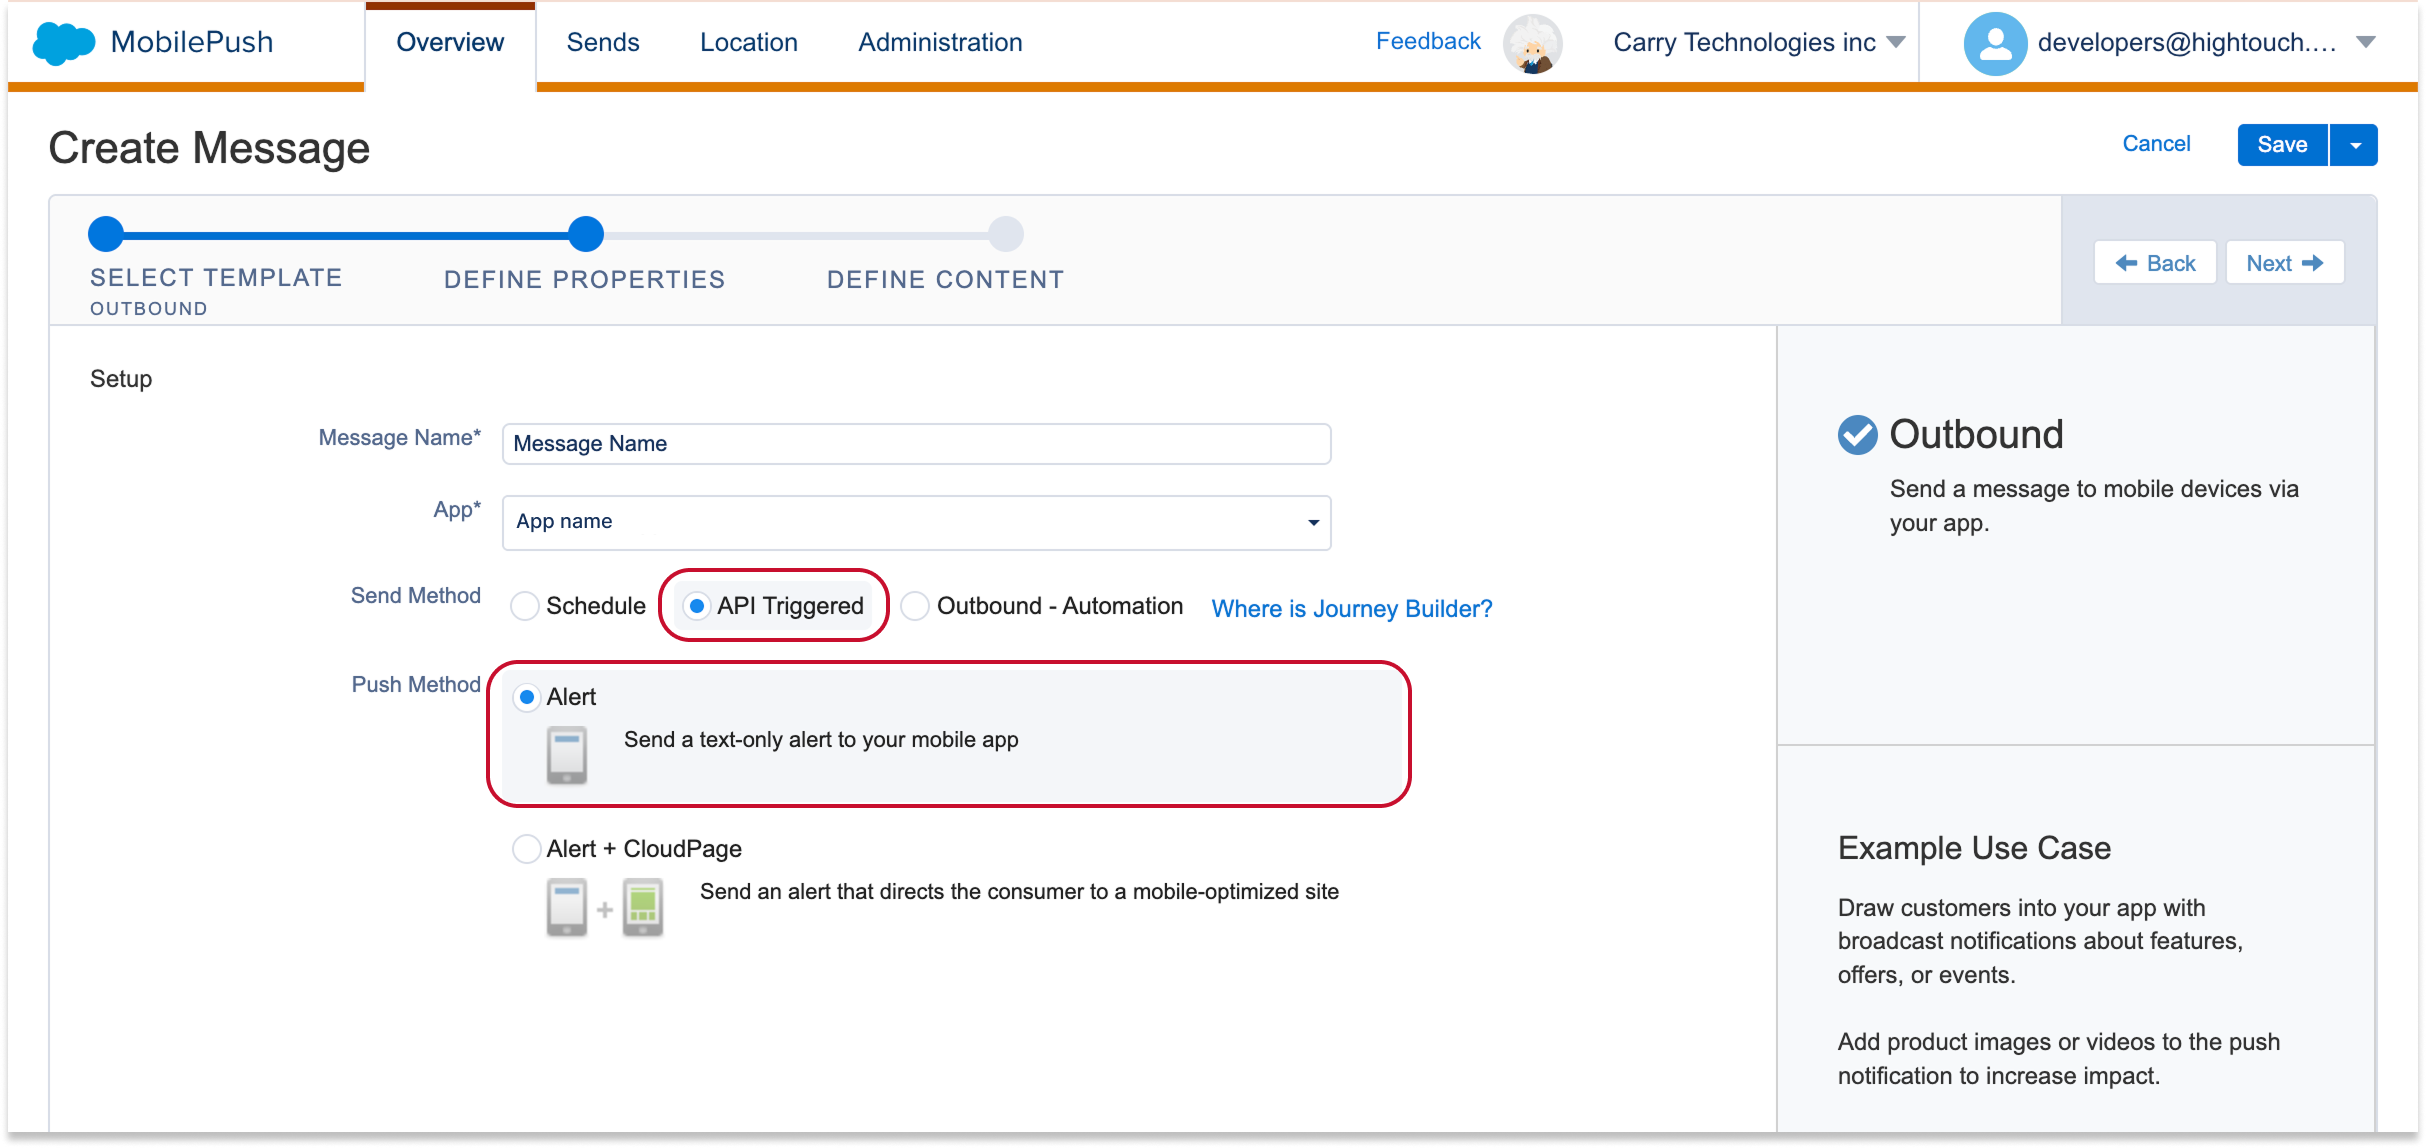
- Create the template for your push alert.
- Save your message.
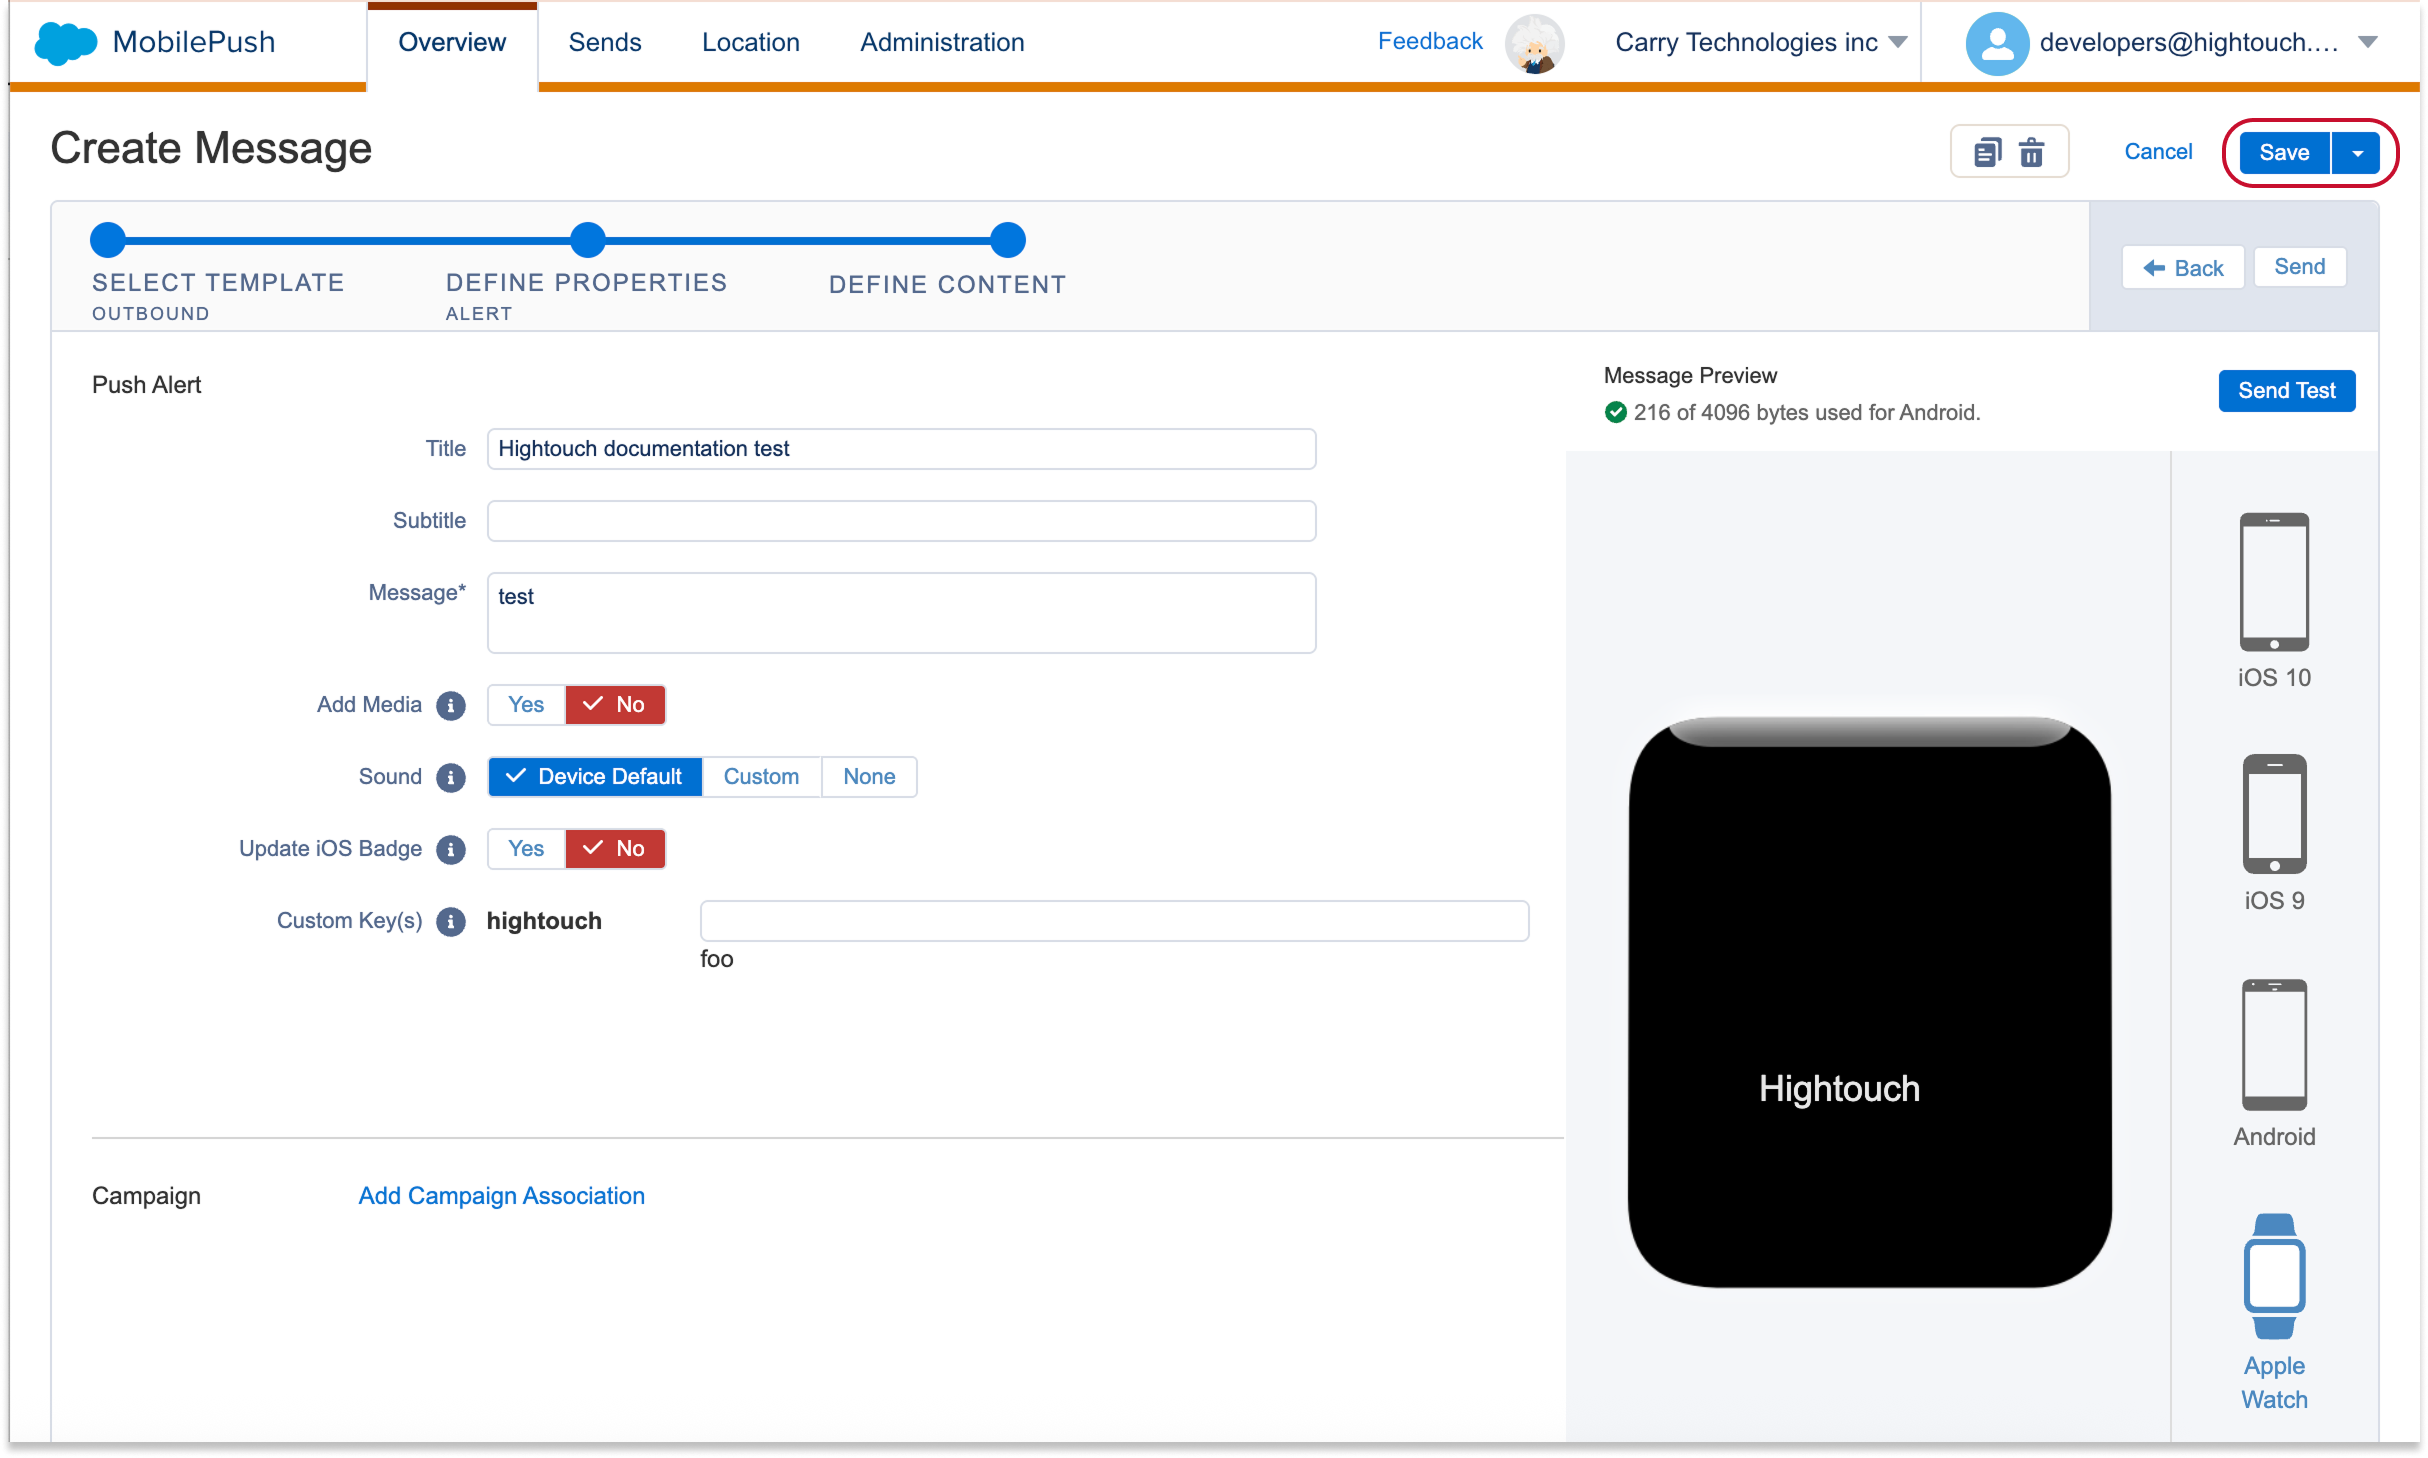
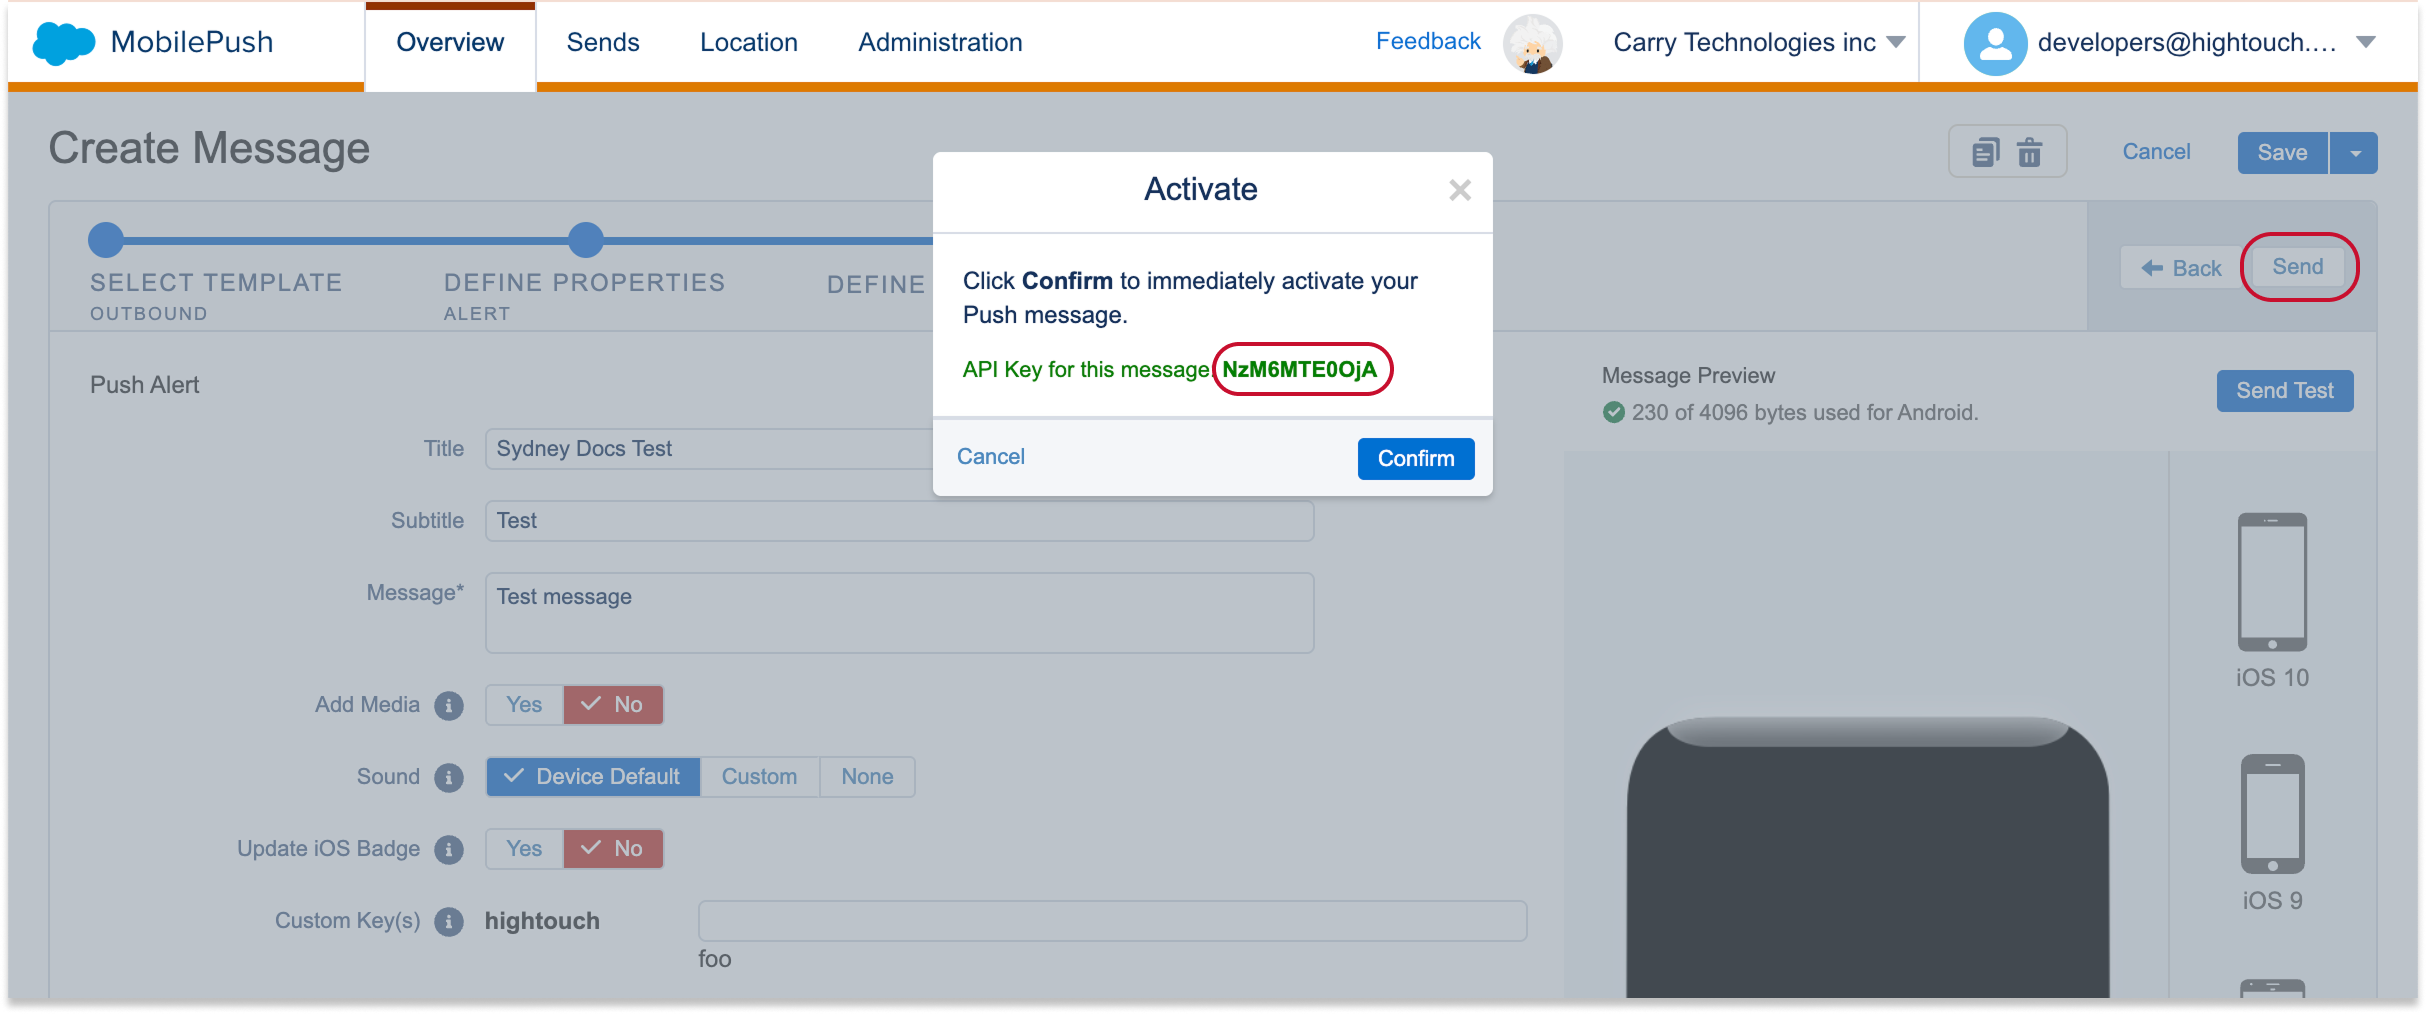
- Click Send in the top right-hand corner.
- An activation window should pop up with an API key. Copy this API key to make it easier to find the template in Hightouch in a later step.
Add a message in Hightouch
In Hightouch:
- Add a message from your SFMC push template.
Preview content
Hightouch automatically creates the variables for push notification title, subtitle, and body. The values you supply here are used directly in the push notification without any need for code snippets in the template. If these are left blank, Hightouch uses the default values in the template.
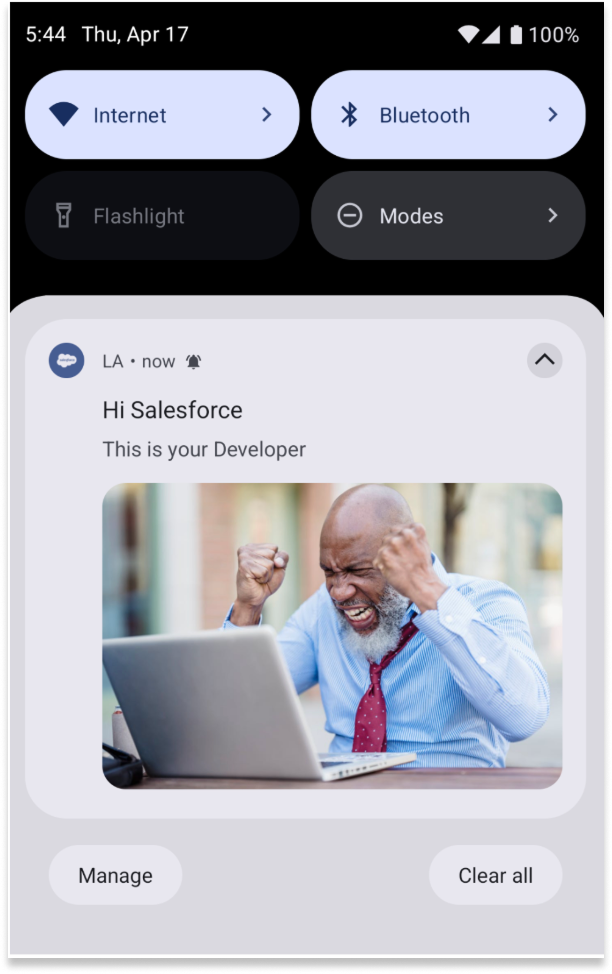
Send tests
- To test push notifications, paste the contact key you use in your SFMC contacts.
- Personalization strings can be supplied directly in the values for the variables without any need for code snippets in the template.
Send push (app inbox) notifications via Triggered Send
Enable the push channel
- Add a channel with the sync type set to Triggered Send.
Configure your push template in SFMC
In SFMC:
- Go to Mobile Studio > MobilePush.
- Click Create Message.
- Select the Inbox template and click Next.
- Name your message and select your app.
- Select API Triggered as the Send Method.
- Select Alert as the Push Method and click Next.
- Create the template for your push alert.
- Save your message.
- Click Send in the top right-hand corner.
- An activation window should pop up with an API key. Copy this API key to make it easier to find the template in Hightouch in a later step.
Add a message in Hightouch
In Hightouch:
- Add a message from your SFMC push template.
Send push notifications via Journey
- Add a channel with the sync type set to Journey entry.

- Add a message from your SFMC push template.
- In the Content tab, set the variables and click Send Test.
Send push notifications via Data Extension
- Add a channel with the sync type set to Data Extension.
- Choose Insert or Mirror mode.
- Add a message from your SFMC push template.
- In SFMC, configure your send logic to read from the Data Extension that Hightouch populates.
Send in-app notifications via Journey
Enable the in-app channel and add a message
- Add a channel with the sync type set to Journey entry.
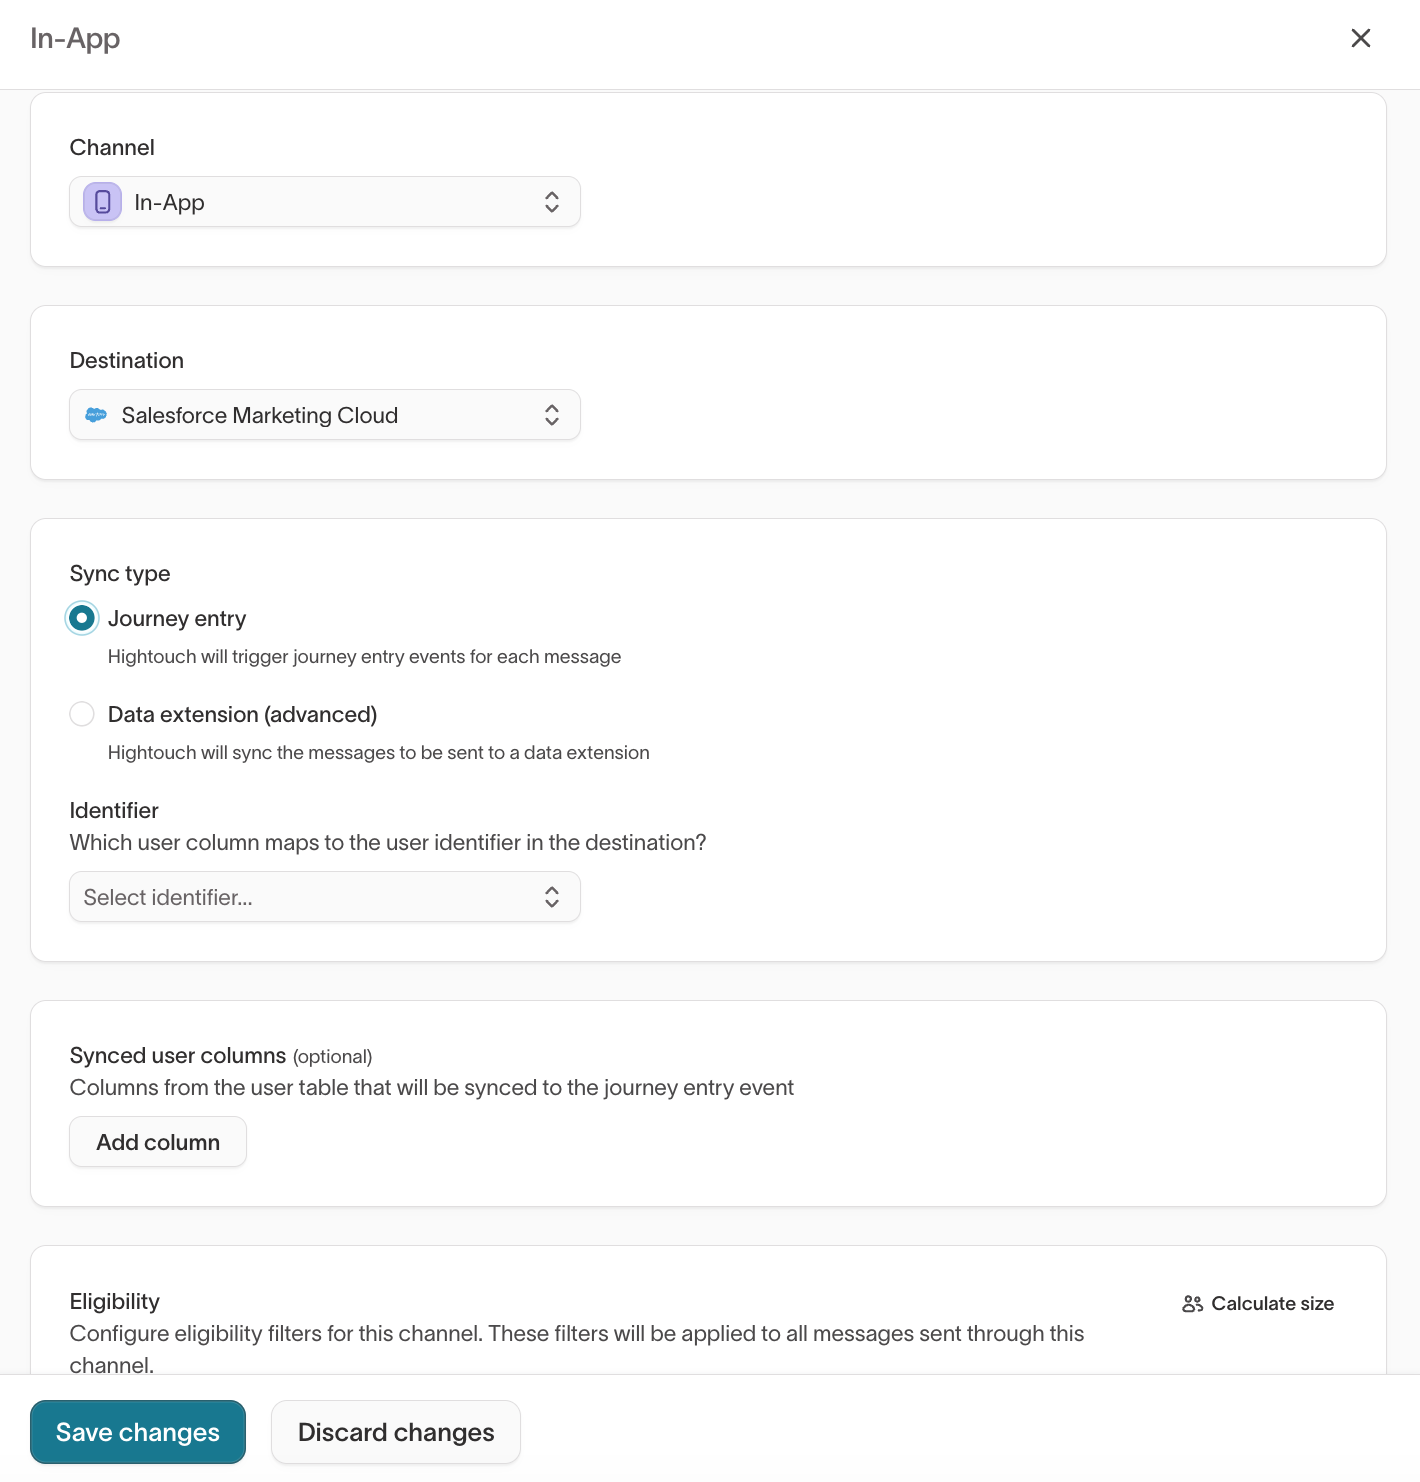
- Add a message from your SFMC in-app template.
Link your message to an SFMC Journey
In these next steps, you will link your newly created message to an associated Journey in SFMC.
In Hightouch:
- Go to the Content tab within your message to add the variables you would like Hightouch to control.
In SFMC:
- Go to Journey Builder > Journey Builder.
- Click Create New Journey.
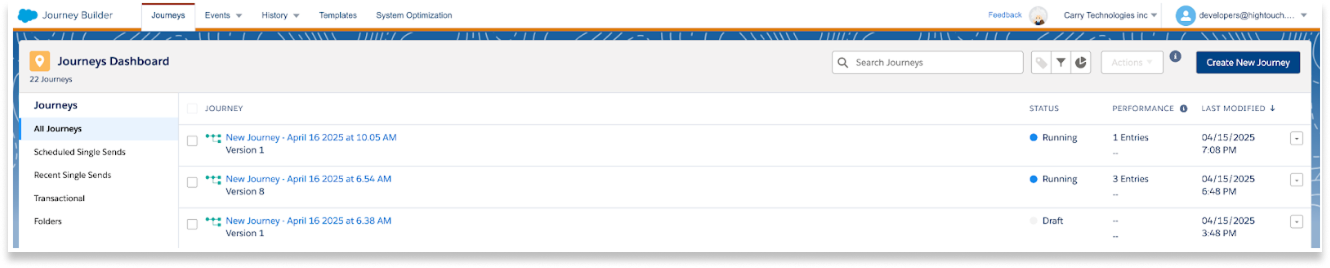
- Select Multi-Step Journey.
- Select API Event as the entry source. Drag it onto the Journey Builder.
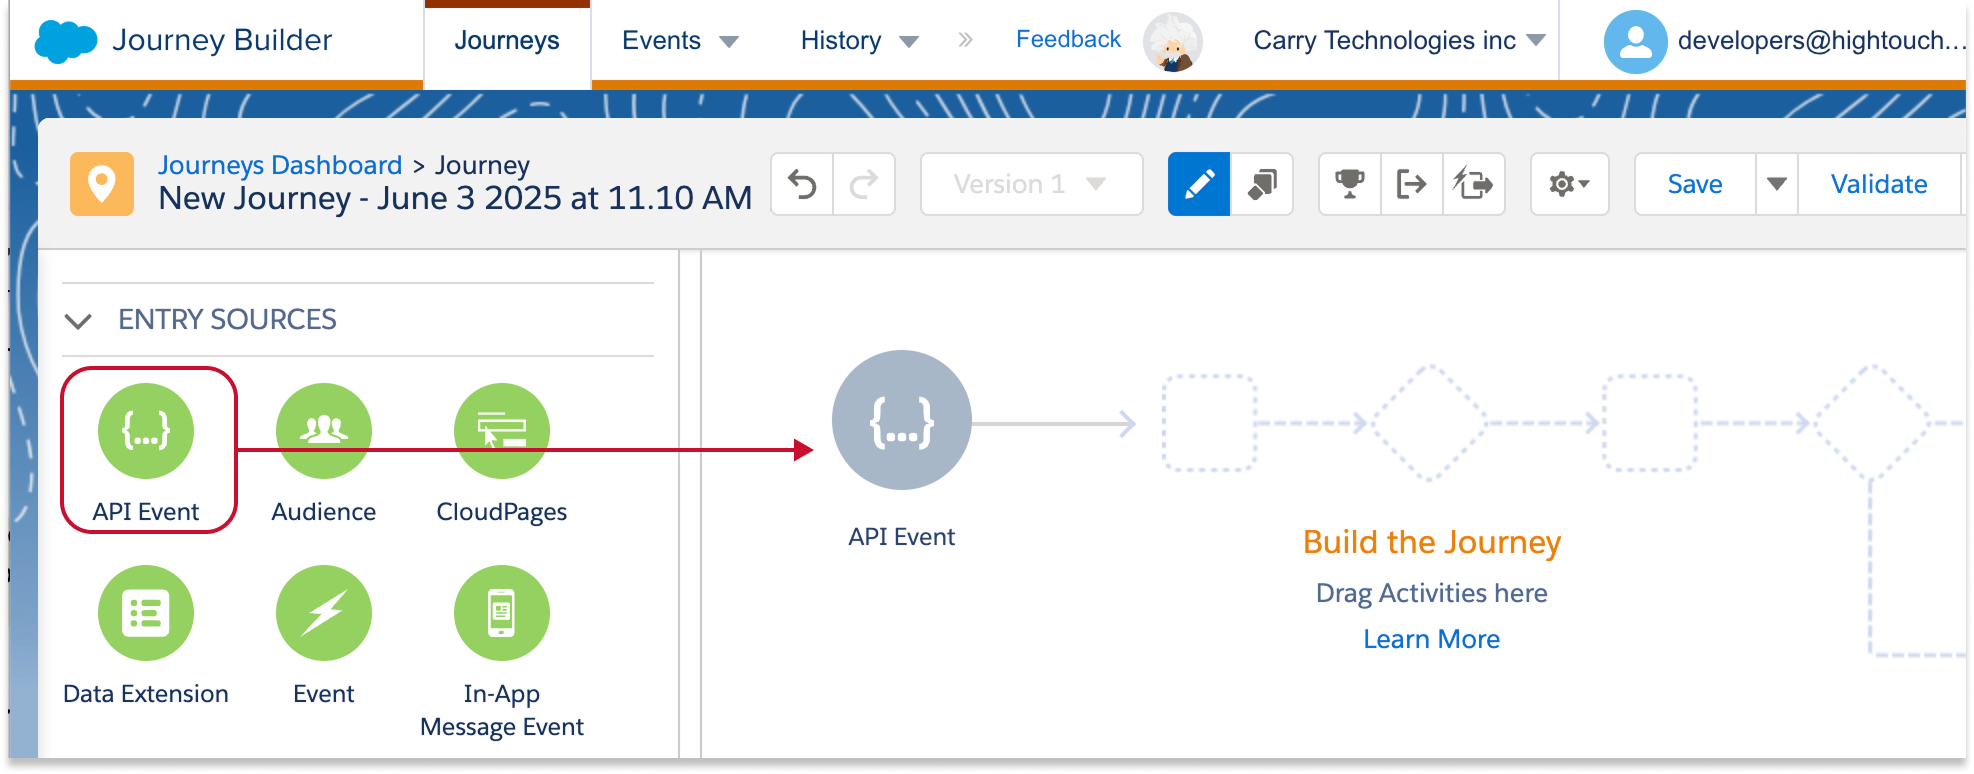
- Click the grey API Event icon in the Journey Builder. This will open a list of API Events.
- Select the message name you chose when adding the message in Hightouch.
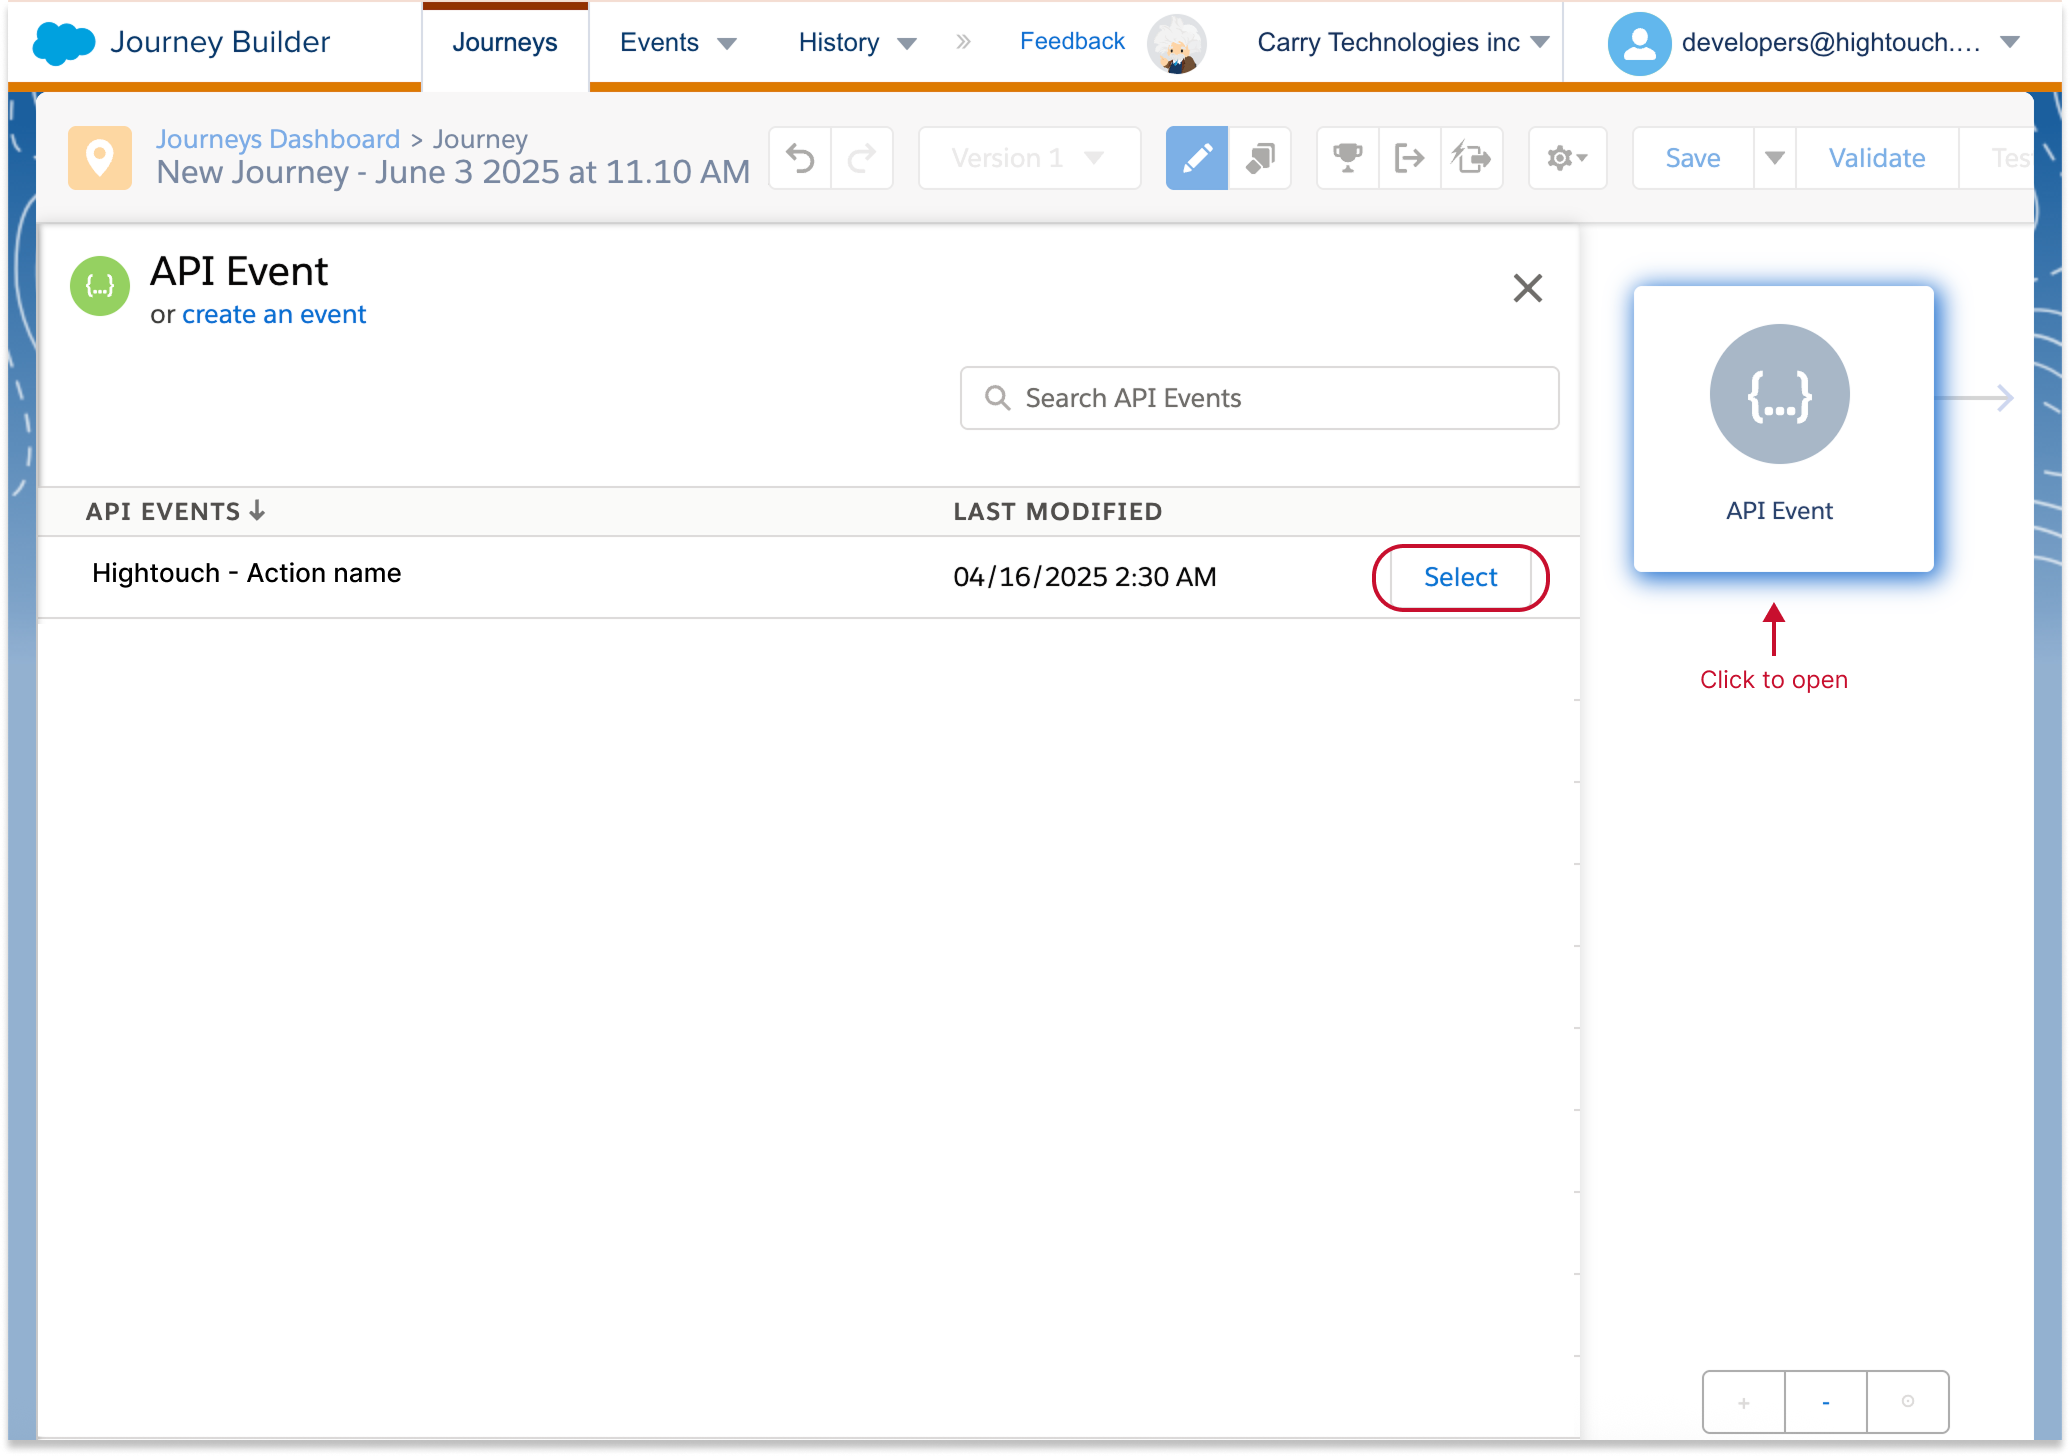
- Click Done.
- Next, drag In-App Message to the Journey Builder.
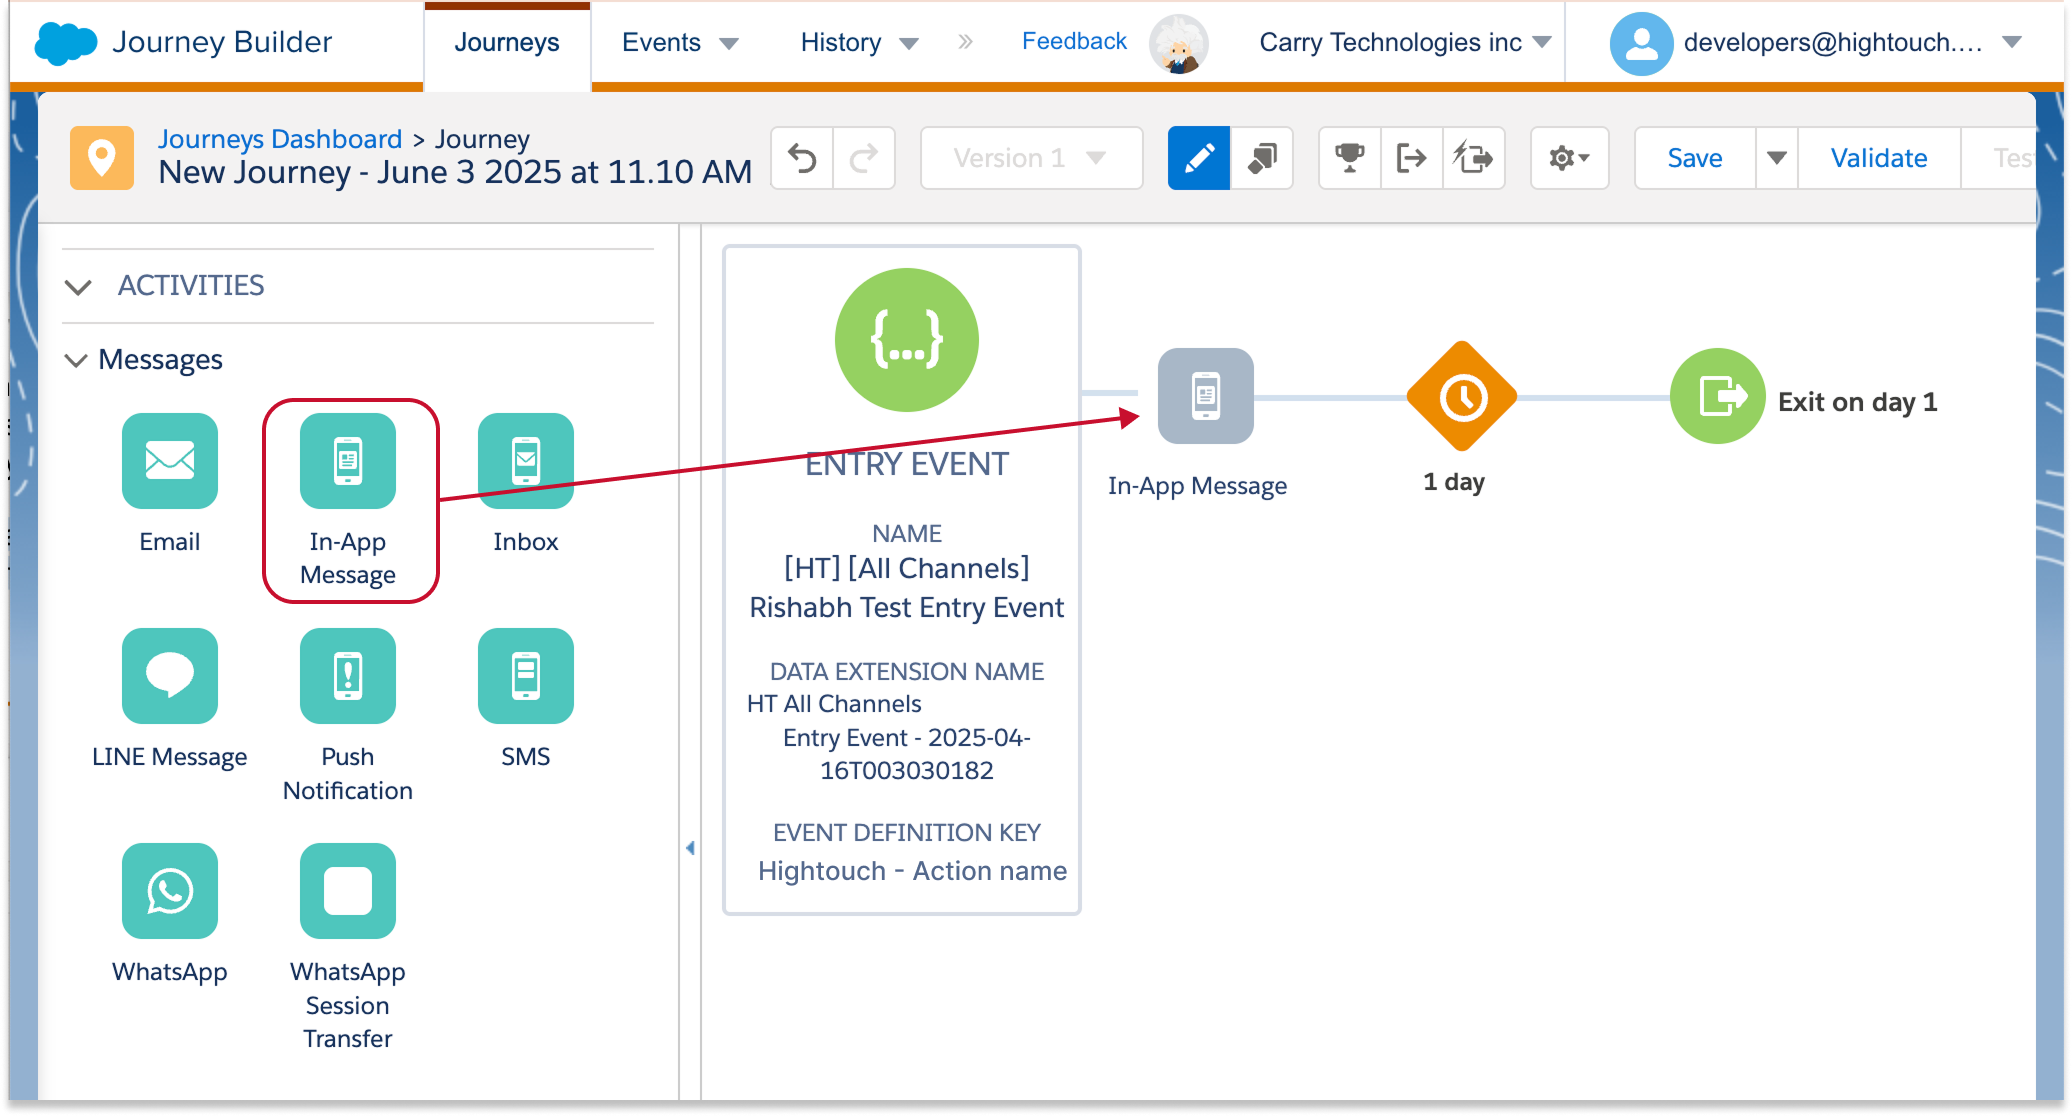
- Click the grey In-App Message icon in the Journey Builder.
- Select (or create) your desired in-app message template.
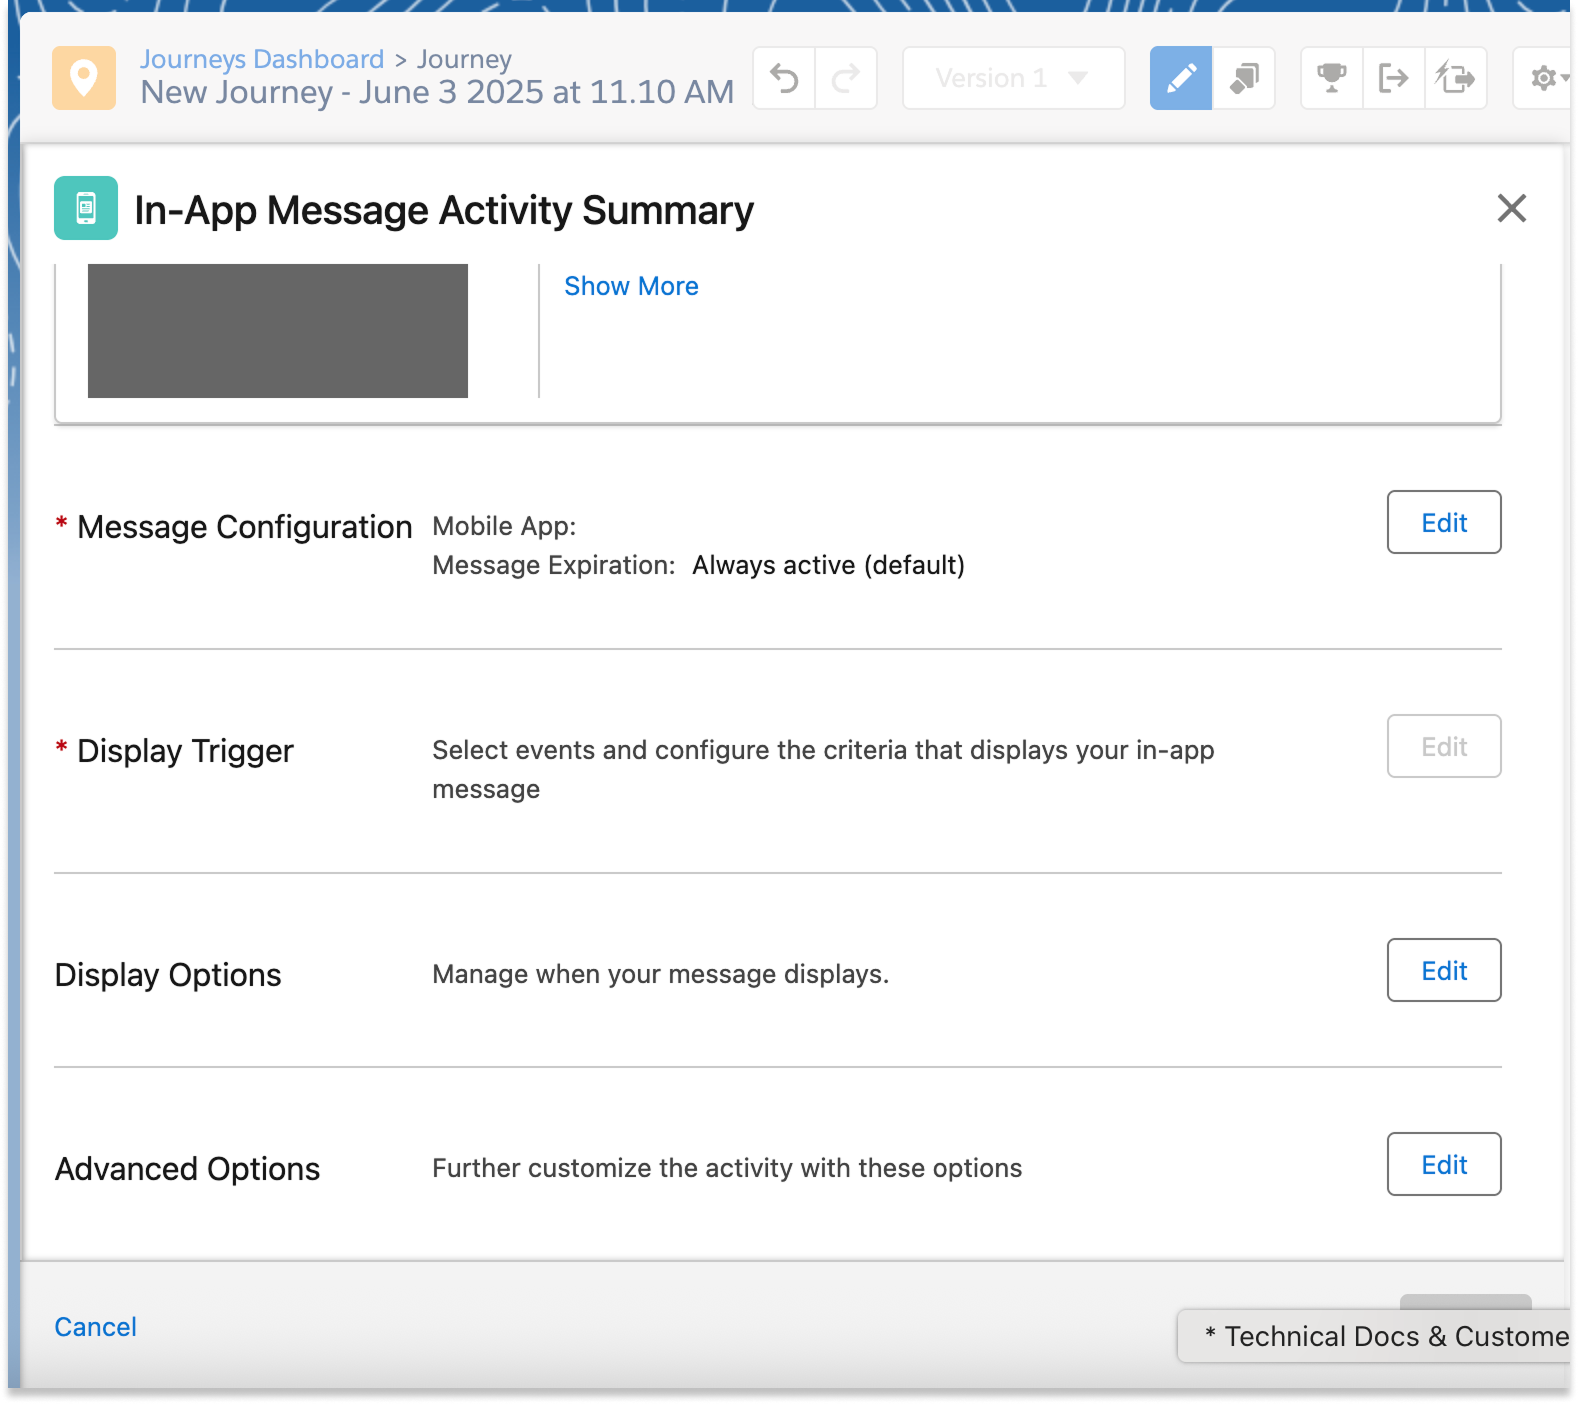
- In the In-App Message Activity Summary, edit the required settings for Message Configuration and Display Trigger. Optionally, configure Display Options and Advanced Options as desired. See SFMC documentation for more details.
-
Optional: If you would like Hightouch to control aspects of the In-App Message, follow the instructions for using variables in SFMC templates.
- Paste the variable code snippets from Hightouch into SFMC:
- Select a message in Message Definition
- Click Edit Selected Message
- Paste the variable code snippets from Hightouch into SFMC:
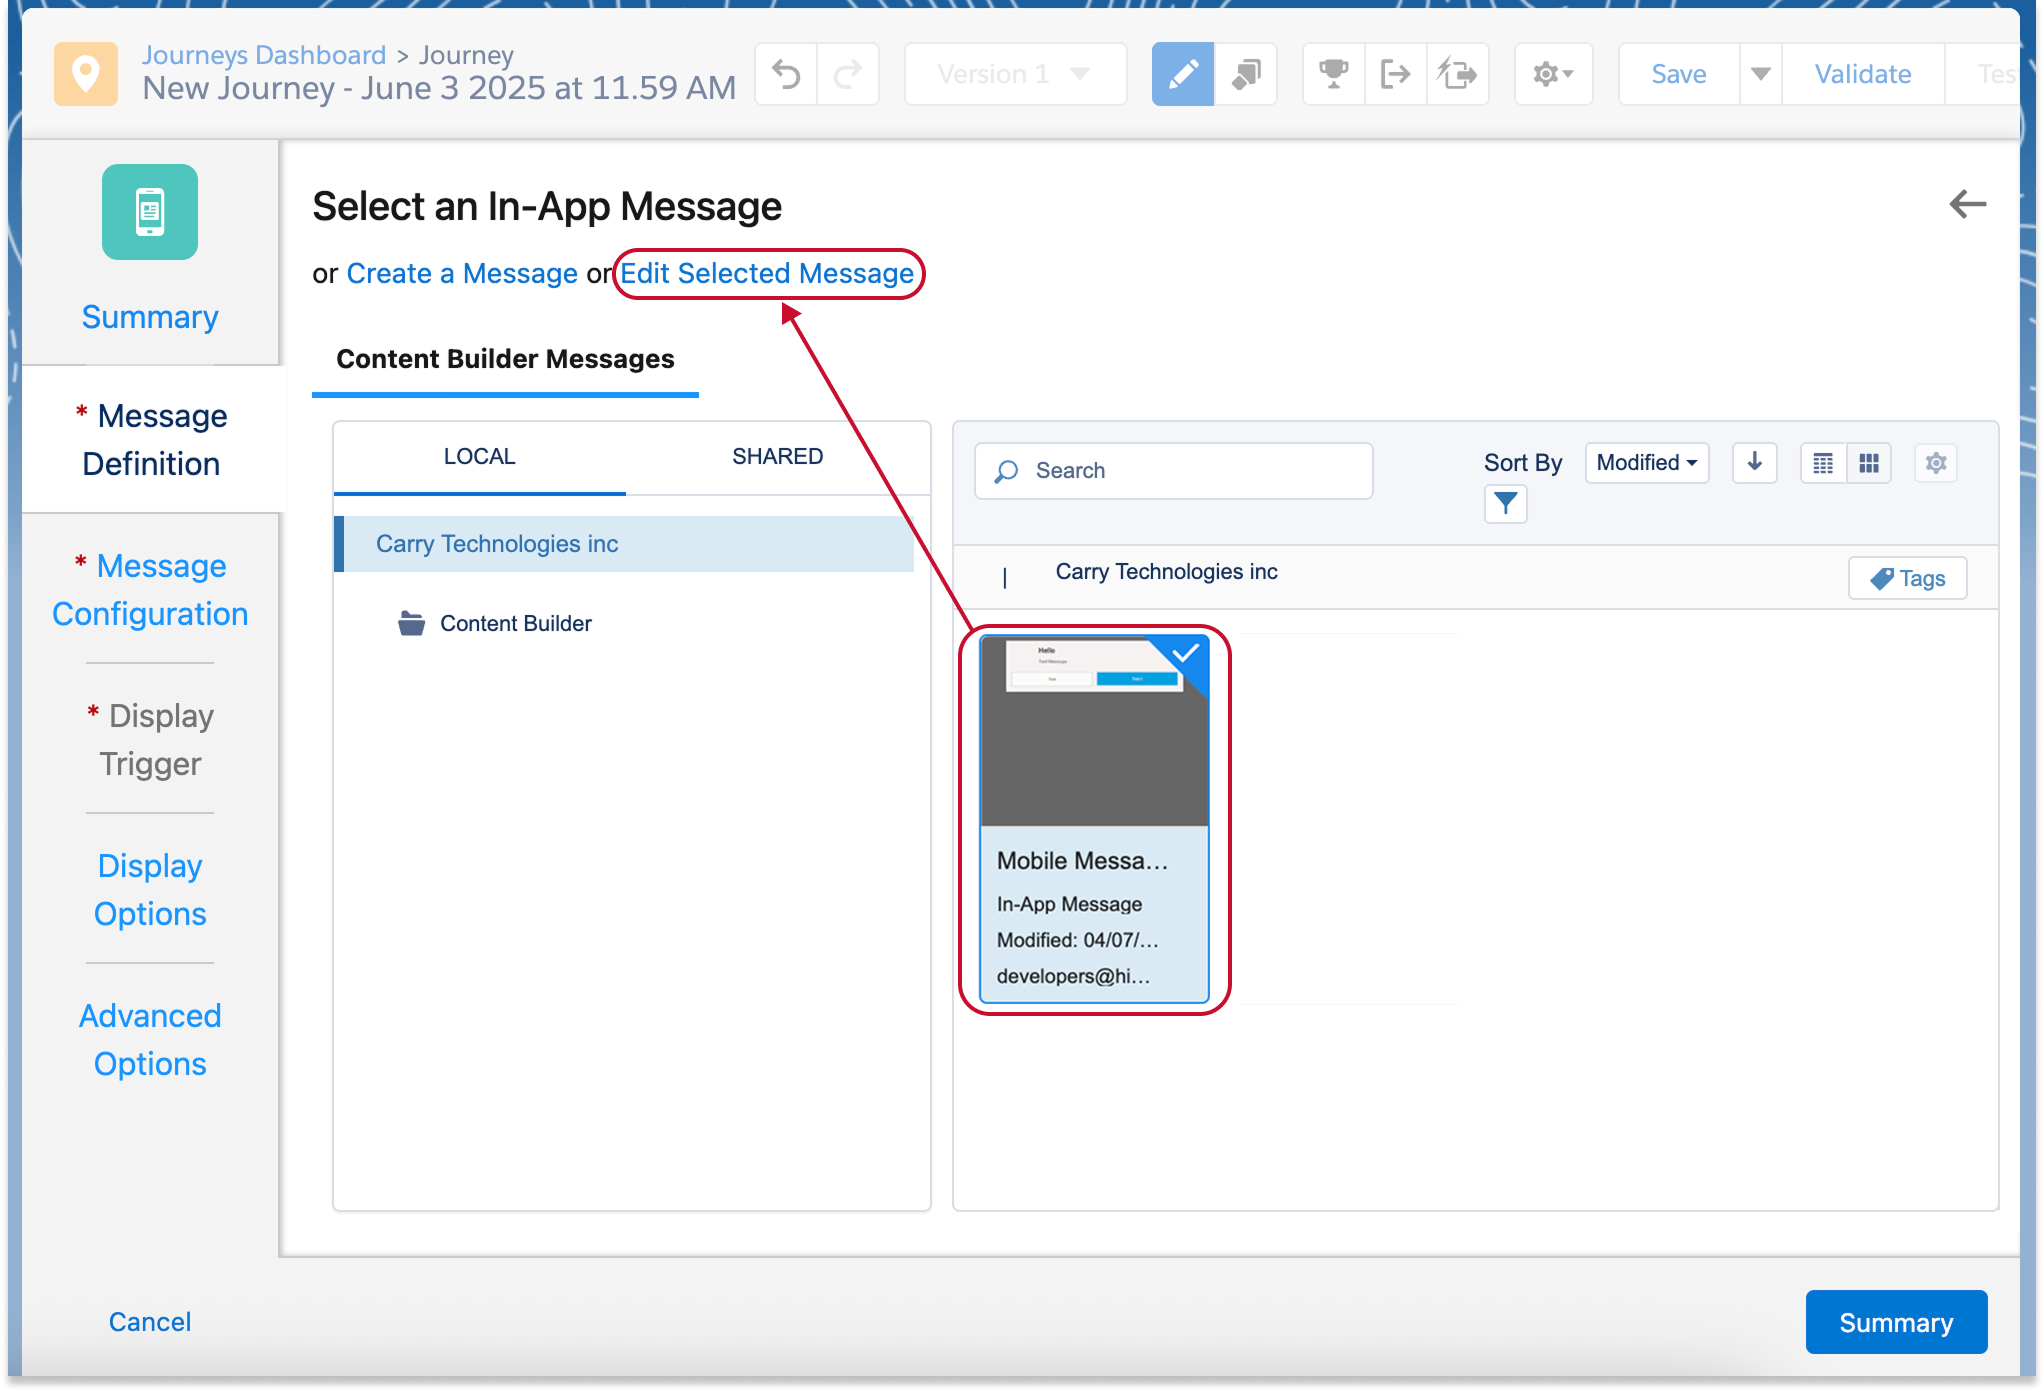
- Paste the copied code snippets from Hightouch into the Content tab that opens.
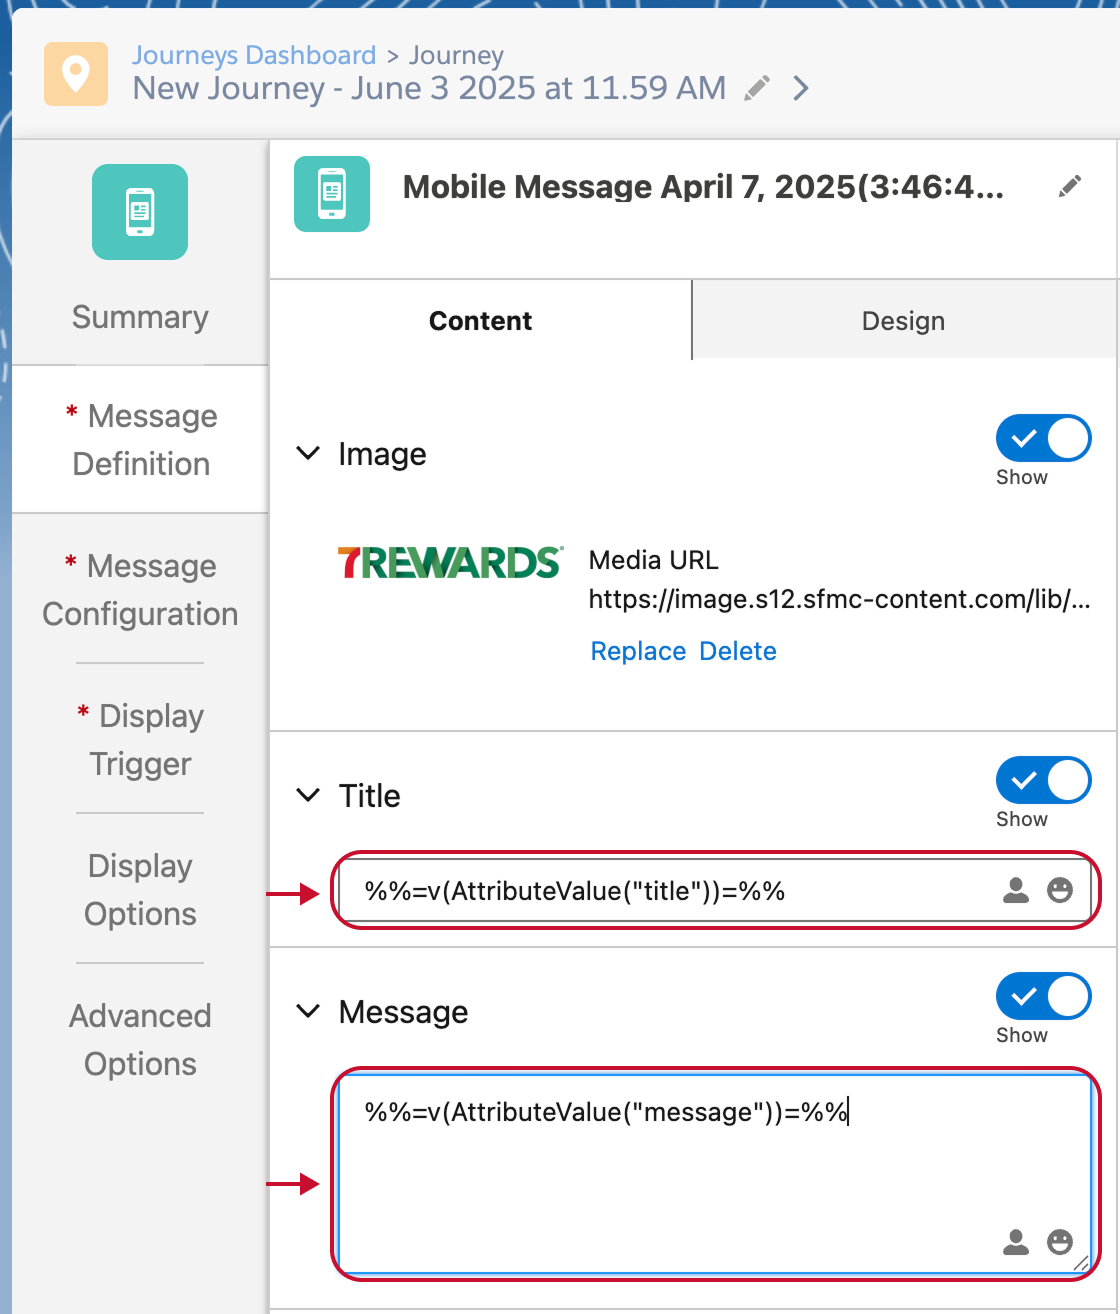
- Save your changes.
- Optional: To continuously test sends, click the Gear icon > Journey Settings and select re-entry any time.
- Activate your journey.

In Hightouch:
- Return to Hightouch and refresh the Content tab within your message.
- Preview your content to ensure everything is accurate.
- You can now Send test to subscribers.
Send in-app notifications via Data Extension
- Add a channel with the sync type set to Data Extension.
- Choose Insert or Mirror mode.
- Add a message from your SFMC in-app template.
- In SFMC, configure your send logic to read from the Data Extension that Hightouch populates.
Use Variables in SFMC
Hightouch variables allow you to personalize SFMC messages using live warehouse data, any variable you've defined within the message such as subject line variations, or different content blocks.
Access variables
- Open a message in Hightouch and go to the
Contenttab. - Under Optimized content, expand a content type (for example, subject or body) and add your variants.
- Click the
...menu on a content type and selectCopy code snippetto get the variable code. - Paste the code into your SFMC template. These snippets render with real values for each user when the message is sent.
Important notes
- Triggered Sends: Variables are fully supported.
- Journeys: Variables are available via Data Extension fields synced by Hightouch.
Troubleshooting
| Issue | Likely cause | Resolution |
|---|---|---|
| Message fails to send | API errors or misconfigured destination | Check Hightouch logs for API errors. |
| Test user not receiving messages | Identifier mismatch | Verify the identifier matches a valid Subscriber Key in SFMC. |
| Triggered Send not firing | Send not started | Confirm the Triggered Send is in Running status in Email Studio. |
| Journey sends not triggering | Journey not activated or entry event misconfigured | Confirm the Journey is activated and the API entry event is configured. |
| Variables not rendering | Incorrect syntax or missing field mapping | Double-check variable syntax from Copy code snippet and field mapping. |